


 Customer Reviews
Do you want your audience to say “Wow” when they look at your slides? And hear the wow get bigger and louder when you tell them you created those slides on your own, that too in PowerPoint!
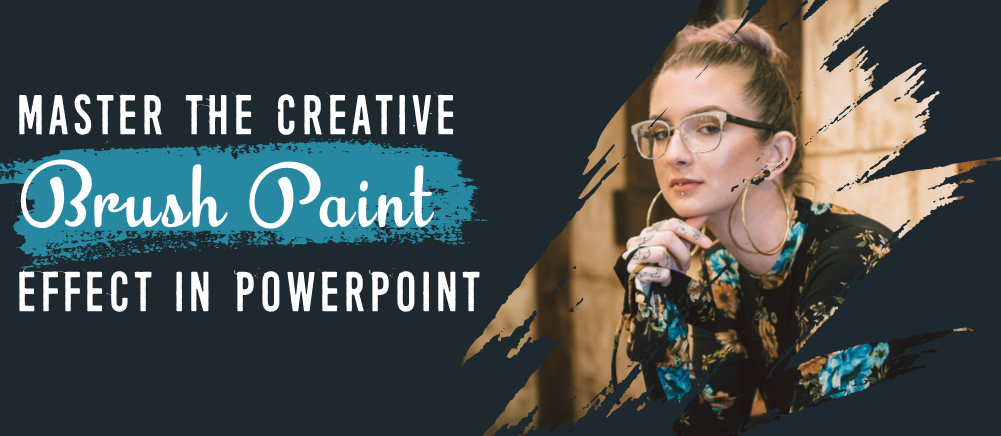
That’s right. We are not bluffing. You have seen the banner image already. That was created in PowerPoint in just 5 minutes. No photoshop, no Adobe Illustrator or any other software. The effect can be called Paint Brush Effect as the slide canvas looks totally a painter’s canvas brought to life with a few strokes of his brush. Time to become PowerPoint Picasso!
This effect is also very similar to the Split Image Effect that we had shared a while back and readers had loved. However, unlike the smooth edges splitting images gave us, the Paint Brush effect lends a rough, artistic and creative look to a slide that makes you want to frame it on a wall.
Enough talking. Let’s master this design hack, add it our skill arsenal and make our PowerPoint presentations rock!
What you will learn to create in this tutorial:

Download this awesome PowerPoint Template
Steps to Create the Paint Brush Effect in PowerPoint:
Step #1- Download and Install a Brush Font
There’s only one thing you need to create this effect yourself in PowerPoint: a brush font. There are hundreds of free brush fonts available on the web for personal and commercial use. We have used a beautiful brush font Overdrive Sunset to create this brush effect. You can use any other brush font too.
- Download the free font
- Install it on your system
- Open PowerPoint and type text (Hi) on slide
- Change the font to Overdrive Sunset and increase the font size (we kept it 287)

Step #2- Turn the “I” letter into an Object
The next step is to convert the font into an object for filling it with an image. You can turn any letter into an object. For simplicity reasons, let us take the letter “i”. Follow these steps:
- Keep the letter“i” on your slide
- Insert the Rectangle shape from the Shapes menu (under the Insert tab)
- Draw the rectangle such that it covers the font completely
- Right click on the rectangle, click Outline and select No Outline

- Go to the Format tab on PowerPoint ribbon
- Select the rectangle, open the Send Backward menu and click Send to Back

- Now, select the rectangle first, press Ctrl and select the letter
- Go to Drawing Tools Format
- Open the Merge Shapes dropdown menu
- Select the Intersect option

Step 3- Place Objects Together to Create Single Object
Now, select the newly created object, right click, click Copy (Ctrl + C) and Paste it (Ctrl + V). Put them adjacent to each other. Repeat this process at least 7-8 times and place all objects/shapes together. You can rotate some shapes using the rotation handle on top to create ragged edges above and below. Check the screenshot below (the color of object was changed to black simply because of author’s personal liking for that color; please do not get confused):

See that all shapes are selected before following these steps:
- Go to Drawing Tools Format
- Open the Merge Shapes dropdown menu
- Select the Union option

Our paint brush shape is ready! Now time to fill it with our image.
Step 4- Insert Image using Picture Fill
The last few steps go like this:
- Right click on the shape and click Format Shape
- A Format Shape window will open to your right
- Select the Picture or texture fill radio button
- Click the File button to choose the image saved on your system

You’ll find that your image looks squashed in the shape as the aspect ratio is distorted. The area you wish to highlight is also not clearly visible in the picture area. Don’t worry. Follow these steps to resize the picture and adjust the image:
- Go to Picture Tools Format
- Locate the Crop button and open the menu
- Click the Fill option

You can now move the image left or right or increase its size using the image borders (the black handles are to adjust the size of the shape, not the picture).
Now, add your text next to the image to complete the slide. If you love the font we have used in the heading “How to Lead like an Alpha Wolf”, it is Bebas Neue.
If you want to add such cool fonts to your PowerPoint font library, check out the post below:
15 Must-Have Free Business Fonts for Beautiful Designs
Don’t have time to create the above design? Download the slide and amaze your audience.
Quick Tip: How to Fix Images in Rotated Object
If you rotate the paint brush object that you created in step 3 and then insert image using Picture fill, you’ll find that the image is rotated too. To fix that, all you need to do is uncheck the checkbox- Rotate with shape (see the screenshot below) and voila, your slide is picture perfect. So, rotate the picture object as many times to create different brush styles without any hassle.

More Paint Brush Style PowerPoint Templates
Want to check out more such readymade brush style PowerPoint templates? Our Presentation Design Services Team has designed these specifically for you:
Agenda PowerPoint Template

Download this Creative Agenda PowerPoint Template
Team PowerPoint Template

Download this Creative Agenda PowerPoint Template
Company Mission PowerPoint Template

Download this Creative Mission Statement PowerPoint Template
Company Vision PowerPoint Template

Download this Creative Business Vision PowerPoint Template
Vision and Mission PowerPoint Template

Download this Creative Vision & Mission PowerPoint Template
Self Introduction PowerPoint Template

Download this Creative Self Introduction PowerPoint Template
About Me PowerPoint Template

Download this Creative About Me PowerPoint Template
Startup PowerPoint Template

Download this Creative Startup Slide
Leadership PowerPoint Template

Download this Creative Leadership PPT Template
Product Development PowerPoint Template

Download this Creative Product Development Slide
How to Edit the above Templates
Very easy. We have converted all the above objects into Picture Placeholders. So all you need to do is click on the image, press Delete and you will see the Picture Placeholder (see the screenshot below). Click on the picture icon in the centre and add your own image.

How did you like this design hack? Share with us your feedback in the comments below.


