


Fp gear with chain and icons flat powerpoint design





Try Before you Buy Download Free Sample Product
 Impress Your
 Audience
 100%
100% Editable
 Save Hours
 of Time


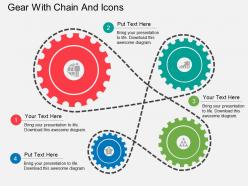
Are you fed up with finding good PowerPoint slide inspiration? Do you believe in inspiring your viewers with wonderfully made PPT slides? All your questions can be answered here if you download our gear with chain and icons flat PowerPoint deck slide. Our PPT slides are in tune with the latest designs and recognized all over for their accuracy and attractiveness. This PPT background slide is consistent with those qualities, using inspiring PPT infographics to enthrall your viewers. The PPT graphics display gears which in turn represent the process of any working product, service or activity finely tuned and ready to move. Finely crafted PPT icons add meaning to the graphics. Text areas alongside each icon can be used to elaborate further about the icon. Never let slide limitations inhibit your ideas with this PowerPoint slide. It is highly customizable, allowing you to alter almost all features. Once downloaded, you will feel the lightness and quick response of this slide. Enjoy all the effort with our Fp Gear With Chain And Icons Flat Powerpoint Design. You will find them a delight to deal with.
People who downloaded this PowerPoint presentation also viewed the following :
Fp gear with chain and icons flat powerpoint design with all 4 slides:
Stylish, modern designs for every presentation are on hand. Choose the one needed to make your project bulletproof.
FAQs for Fp gear with chain and icons
So basically you get way better power transmission and the load gets spread out more evenly. Chain setups are super flexible too - you're not stuck with gears that have to touch directly, which is honestly pretty sweet for weird layouts. Components last longer since the chain distributes all that force instead of beating up one spot. Plus you can work on parts separately without tearing apart the whole thing. Oh and the chain kinda cushions sudden jolts automatically. Just figure out your torque needs first though, then pick the right chain size. Trust me on that order.
Honestly, material choice makes or breaks your FP gear. Steel chains are tanks - they'll handle whatever you throw at them but damn, they're heavy and pricey. For lighter stuff, aluminum's solid though you're giving up some strength. I've been really impressed with composites lately - they don't corrode which is clutch in nasty conditions. Weight vs strength, it's always that balance, you know? Don't just grab the cheapest thing. Match it to what you're actually doing and where you're working.
Oh yeah, FP gear with chains shows up everywhere in manufacturing. Conveyor systems, packaging lines, that kind of stuff. Food processing plants love them, plus automotive assembly and mining ops where you're moving heavy loads - chains just handle that better than belts do. Agricultural equipment too, construction machinery. The icons are actually pretty useful when you're trying to fix something and don't want to dig through manuals. Honestly, if you need something durable over fast, chain drives are the way to go for most industrial setups.
Dude, chain stretch will mess up your FP system more than anything else. Creates slack and kills your power transfer completely. Heavy chains are another problem - they just drag everything down with extra weight. Most people get obsessed with gear ratios but totally ignore basic chain maintenance, which is honestly pretty dumb. Worn links create friction everywhere and eat up your energy. Oh and check tension regularly - don't wait until you can actually see the stretch happening. Replace it early and everything runs way smoother. Trust me on this one.
Clean your FP chains after every few uses - dirt buildup will kill them fast. I use different solvents depending on how gross they get. Marine jobs need different lube than dusty construction sites, obviously. Check for stretched links and wear patterns when you clean them. Store everything dry when you're done. Monthly inspections are a pain but honestly worth it - I've seen too many people skip this and have gear fail at the worst possible moment. The consistency thing really matters more than people think.
Your gear's tooth profile and pitch diameter basically control how the load gets spread across your chain links. Good involute geometry means more links engage at once instead of hammering just a few contact points. Honestly, I've seen way too many people running mismatched pitch specs - it's brutal on chains. Poor gear design creates these nasty stress concentrations that'll kill your chain way faster than it should. Make sure your gear pitch actually matches your chain pitch. When everything's dialed in right, you get that smooth power transfer and your components last way longer.
So those icons are basically visual shortcuts for gear specs - load limits, chain grades, safety factors, all that stuff. Way faster than digging through manuals every time. They're super useful when you're trying to match components quickly, and honestly I don't know how people did this job before standardized symbols. Different manufacturers use the same icons so you can mix and match brands pretty easily. Just heads up though - some symbols change depending on what standards your region uses. I'd keep a reference sheet around until you memorize the common ones. Trust me, it'll save you tons of time once you get the hang of it.
Chain alignment with FP gear teeth is your main nightmare - even tiny misalignment causes binding and parts wear out fast. Tensioning's also a pain since FP gears don't flex like normal setups. Here's what I learned the hard way: map your chain route FIRST, then figure out icon placement around it. I see so many people try to force the chain path to work with their layout and it always looks awkward. The icons end up shoved wherever they fit instead of where they should go. Oh, and don't expect the same visual hierarchy you're used to - the chain basically dictates everything.
First thing - measure your chainline and make sure it matches what your gear's supposed to be. I usually just crouch behind the bike and eyeball it to see if everything's running straight. Chain shouldn't be hitting the teeth at a weird angle, you know? Try moving your rear wheel around in the dropouts if it looks off. Sometimes you need spacers or maybe a different bottom bracket, but honestly I'd start with just checking that chainline measurement. Fixed gear stuff is kind of a pain but once it's dialed it's so smooth.
So basically everyone's going crazy for modular chain systems right now. You can swap out chain segments without any tools, which is actually pretty genius. The smart icons are wild too - they literally change based on what you've got plugged in. Some companies are even testing haptic feedback with the icons, though I'm not sure how useful that'll be honestly. Oh and they're using way lighter composite stuff instead of the old heavy metal links. Modular seems like the way to go since you can actually customize everything instead of being stuck with whatever setup you bought.
Yeah so gear ratio is basically about matching your power transfer to what you actually need. Higher ratios multiply your torque but you'll lose speed. Lower ratios flip that around. Most people just grab whatever's common and then can't figure out why their system runs like crap - honestly drives me nuts. You gotta look at your actual load first. What's it demanding? Then work backwards to find the sweet spot. Getting this wrong means you're either missing torque when you need to push hard, or you're stuck crawling when you should be moving fast. It's one of those things that seems simple but really isn't.
Dude, first things first - gear up with safety glasses, gloves, and steel-toed boots every single time. Check your chains before lifting anything; look for worn spots, stretching, or busted links. Match your load ratings to what you're actually hoisting up there. Chains get weird under stress, so don't mess around with the working load limits. Use proper rigging with the right slings and hardware. Oh, and those little icons stamped on the gear? Actually read them - they'll save your butt by showing safe operating specs. Keep people away from wherever that load might swing or drop.
Temperature swings and humidity will destroy your gear if you pick the wrong materials. Stainless steel or special coatings work great in wet conditions. For crazy temps, you might need exotic stuff that won't crack. I've watched too many people go cheap and their chains snap after like 6 months - such a waste. Salt air's brutal too, plus UV and vibration. Oh, and map out your worst conditions first, then figure out what materials can actually survive that mess. Don't just guess based on normal operating conditions, you know?
Match your chain to what you're actually hauling and where you'll be using it. Check those working load limits first - gotta handle both the weight sitting there and any bouncing around during use. Stainless steel's your friend in nasty conditions, but alloy steel has crazy strength for heavy stuff. Honestly though, most people go overboard with alloy when they don't need to. Don't forget about chain pitch and how it meshes with your sprockets. Double-check it'll actually work with whatever hardware you've got before you order. Oh, and grab some spare links - you'll thank me later when something breaks in the field.
Dude, heavy-duty FP systems need service every 500-750 hours while standard ones can stretch to 1000-1500. Load stress is the culprit - those heavy-duty units just get hammered way harder. Chain components especially take a beating. I've watched guys try pushing heavy-duty intervals to match standard schedules and it never ends well. Your system icons will give you heads up when service time hits, but honestly? Don't count on them completely. Keep your own calendar based on actual hours. Oh and definitely eyeball those chains for stretch during every check - that's where you'll spot trouble first.
-
Top Quality presentations that are easily editable.
-
Great quality product.