Morph (Verb): to gradually change one image into another, or combine them, using a computer program. Cambridge Dictionary
Animation has never been this good in PowerPoint! Thanks to a new transition (yes, not an animation) effect introduced by Microsoft in PowerPoint 2016 called “Morph.” Using this transition, you can smoothly animate the movement of the objects, words and characters in your slide with just a single click!
See for yourself the magic of Morph:
Tweet This Awesome Feature
You, however, need to have PowerPoint 2016 and Office 365 subscription to use this cool feature.
What effects you can achieve with Morph:
- Morph Objects- Move entire objects like picture, shapes, SmartArt and charts. Rotate, resize, change the colors and zoom in.
- Morph Words- Move individual words- rotate, resize the font, change the font type, etc. But for it to work, you will have to keep the character case or capitalization the same.
- Morph Characters- Move individual characters. Keep the character case or capitalization same for this to work.
How Morph Works
To make the Morph transition work, you need to have 2 slides with at least one object in common. Three steps are all you need to follow:
- Duplicate the original slide
- Make the changes you wish to see in the second slide (size, color, position, rotation, etc.).
- Apply Morph transition to the second slide
Let’s understand it with the example you saw in the video.
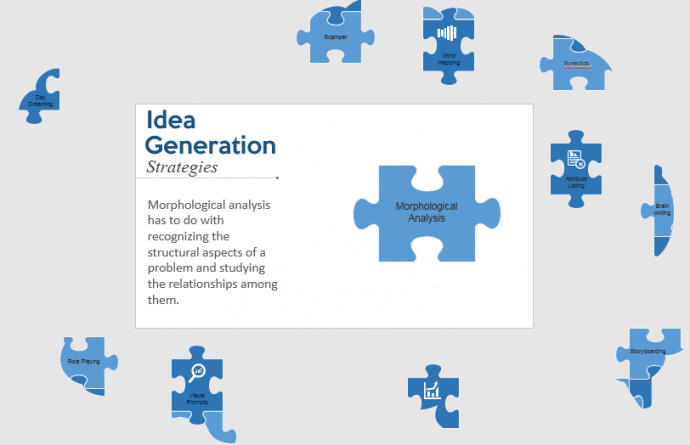
Original Slide- This is our original slide.
Now, as you saw in the video above, we can make this slide so much more interesting with the Morph transition. We want all the puzzle pieces to flow into the slide and fit together seamlessly to form the human brain. Let us show you how we did it and how you can do the same for your slide:
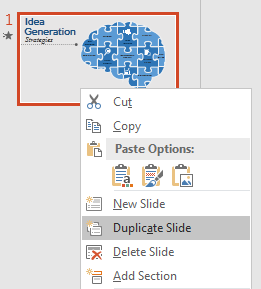
Step 1: Duplicate the Slide
Right click on the original slide and choose the Duplicate Slide option. You can even use the shortcut Ctrl + D to duplicate the slide.
Step 2- Make Changes to the Object
Usually, you need to make changes in the duplicate slide (slide 2)- resize, rotate, zoom in, etc. But since over here, we want the puzzle pieces to fly into the slide and fit together, we will have to make them disappear from slide 1 (original slide). So, move to slide 1 and move the objects out of the slide.
To avoid any confusion, always remember- Slide 2 will be the morphed slide, the slide you want to finally see.
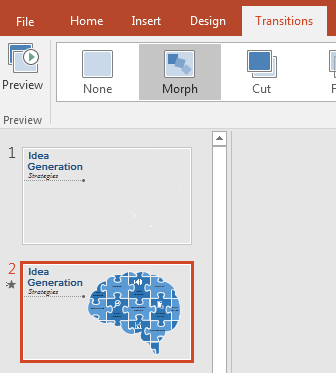
Step 3- Apply Morph Transition to the 2nd Slide
Now, apply the magic tool to the second slide. Locate the Morph transition under the Transitions tab. A star icon will appear next to the thumbnail of the second slide indicating that a transition has been applied.
That’s it. Play the slideshow and watch the slide morph beautifully! Play it in reverse and watch the action unfold backwards. Super cool!
Taking Morph Forward:
As you saw in our morph video, we further used the PowerPoint transition to create even more magic with this slide. Here’s what we did:
Zoom in, zoom out, rotate, move slide object:
Now that we have brought all puzzle pieces together to show Idea Generation Strategies, let us zoom in on to one particular puzzle piece/strategy. To achieve that, steps will remain the same:
- Duplicate the Slide (slide 2)
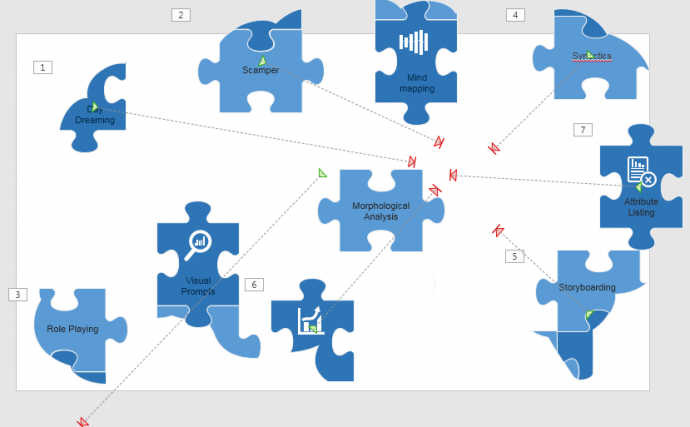
- On slide 3, move all puzzle pieces except one out of the slide (see screenshot below).
- Increase the size of the puzzle piece remaining on the slide
- Ensure Morph transition is applied to the third slide too
Now, when you play the slideshow, the puzzle pieces will move out of the slide while the one on the slide (morphological analysis) will zoom in creating a spectacular effect! You can take this forward in the next slides by moving out one puzzle piece and bringing in another. The total effect is a seamless experience that every viewer will enjoy!
Morphing Individual Letters on Your Slide
You can also morph the characters in your slide to create a magical effect and highlight the most important words in your presentation. Check out how the morph transition looks when applied to characters in the video below:
How to Apply Morph Transition to Characters
The steps are the same as applying morph to objects, except one additional step.
Step 1 (same)- Duplicate the slide
Here’s your original slide:
Duplicate this slide using Ctrl + D shortcut and alter the text in the duplicate slide. You can change the color, size of the font, its direction, etc. Here’s your duplicate slide:
Step 2 (same)- Apply the Morph Transition
Select the duplicate slide and apply Morph transition to it from the Transitions tab. However, this won’t result in any morphing. So, you need to apply step 3 below.
Step 3- Choose ‘Characters’ from Effect Options
Locate the Effect Options menu from the Transitions tab (see the screenshot below). By default, PowerPoint selects the Objects option whenever a Morph transition is applied. If you want to morph characters, select the Characters option and you’re done!
Why is Morph PowerPoint Transition So Amazing:
The simplicity with which Morph does all the animations might make it appear as just another animation. But that exactly is the biggest strength of this transition- it is so damn simple.
Imagine trying to achieve that same effect with the Motion Path animation. I tried doing that but quickly gave up. You’ll find yourself asking “What’s the starting point, where should I end it” and even if after spending umpteen minutes, you managed to crack that, the effect will be a jerky start and a jerky end. You’ll feel like a complete jerk by the end of the exercise. Here’s proof of my toil with the motion path animation:
Crazy, right? How easy Morph had made!
What about animating characters as you saw in the second video? How will that even be possible with motion path or some other animation?
So, is Morph the perfect PowerPoint transition? No, here are its strengths and limitations:
Strengths of Morph PowerPoint Transition:
- It is a big time-saver!
- Does away with all manual work and trial and error of applying motion path or other animations.
- Smoothly animates all movements of objects, words and slides. No jerks!
- Used wisely, looks very professional and creates audience interest.
Limitations of Morph PowerPoint Transition:
First of all, it is not a substitute to earlier animations. It complements them. You can say it is a powerful tool in your arsenal, a very powerful one. But since this is the first version of the feature, it has some limitations such as:
- It leads to increase in number of slides and naturally, the file size.
- Only duration can be changed in this transition. 2 second is the default duration. You can alter the duration to speed up the movement or slow it down.
- You cannot morph objects and characters simultaneously.
- It does not work if you change the shape altogether; say from rectangle to circle or if you use Edit Points to alter the shape. You can only rotate, resize, recolor, etc.
As you get your hands on this feature, you will find what more can be done with it. But one thing is sure: It’s a great tool and offers endless possibilities. Imagination is the limit when it comes to the use of this tool.
Excited to try it out? Presently, you need to have PowerPoint 2016 and Office 365 subscription. If you want to create a video using this cool effect but do not have it, then let our Professional PowerPoint Designers do the work for you.
Stay tuned for more insights and tutorials, and cool illustrations using this feature! Do share your feedback in the comments below.


![[Morph PowerPoint Tutorial] Beginner’s Guide to Using the Morph Transition in PowerPoint 2016](https://www.slideteam.net/wp/wp-content/uploads/2016/12/Morph-Tutorial-PowerPoint-How-to-Use-the-Morph-Transition-Feature-in-PowerPoint-2016-690x301.png)

 Customer Reviews


