Everyone keeps harping on creating “out-of-the-box” slides. This time we will actually show you how to create one.
The box can be any design element of your choice- a shape, a number or a letter. And once you choose that, we will make an image pop out of that box, literally!
Welcome to Interactive Design! From now, your images don’t have to stay within the four walls of a rectangle. Let the character in the image come out of the box and interact with other elements in the design. And interact with the audience too.
You have already seen the blog banner; so, you know what we are talking about. You also must have second guessed that it was made in Photoshop or Adobe Illustrator. No, this effect can be recreated in PowerPoint. And without too much of a struggle!
We also added it in the amazing list of PowerPoint hacks that till now were thought only in Photoshop (check #8 although this post takes that trick to another level)! If you haven’t checked out that post already, make sure to click the link and go through it once you have mastered the trick that we’ll share in this post.
What You’ll Learn to Create in this Tutorial:
Download the Creative Marketing PPT Slide
Steps to Create Interactive Presentation Design: PowerPoint Tutorial
Step 1: Choose the Placeholder Shape
Decide what your image frame will look like. Will it be a number, letter or a shape? To help you out, say you want to present on “7 Strategies to Woo the Millennials”, you can choose the number 7 as a creative frame for your image. It’s not a hard and fast rule. Even if you do not have any specific number in your Presentation title or slide, you can still choose any random number to give a creative visual treatment to your slide design.
You can also choose a shape, say a triangle, quadrant, rectangle, oval, or any other and place an image in that.
You could also choose a letter from “A to Z” or any from your country’s language and set it as a frame. Like we chose “Z” for the above example to represent generation Z.
P.S. If you opt for a letter or a number, you have to convert it into a SHAPE first!
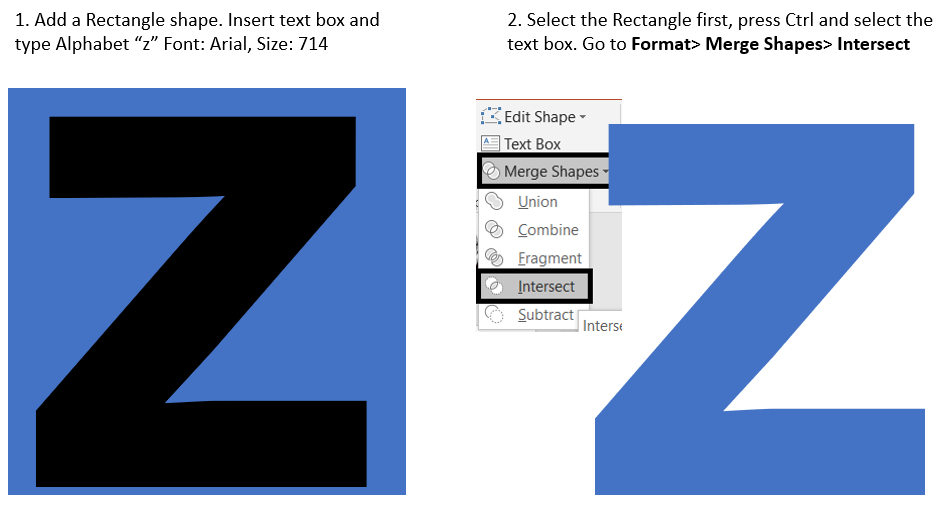
Step 2: Intersect the Image & Letter Shape
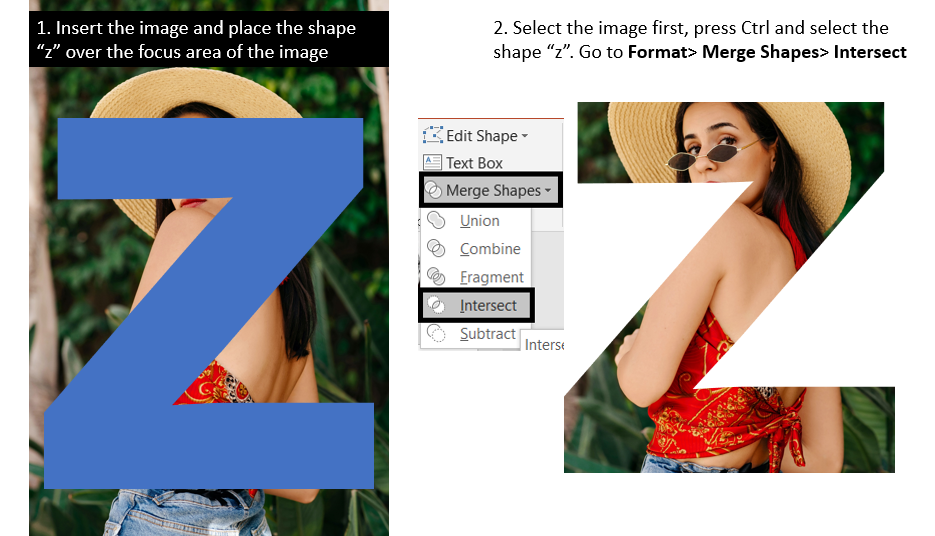
Now, insert your favorite visual in the slide. For this hack to work effortlessly, we advise you to choose an image which has sufficient contrast between the background and foreground. More the contrast, the better. You will understand why this is very important when we do the next step- Remove Background.
Once you have inserted the image, place the letter shape over the visual. Once again, we will use PowerPoint’s amazing “Merge Shapes” feature to cut out the image in the shape of letter “z”.
Step 3: Remove Background from Image
This step can vary in difficulty depending on the image you choose. If the image has maximum contrast between the background and the person/object in the foreground, then you will have no problem in removing background using just a click or two. PowerPoint’s powerful and very useful feature “Remove Background” automatically detects the background and removes it for you. The background is rendered in purple color indicating the area that will be removed.
- If the image has sufficient contrast but it ends up detecting a portion of the focus area as background, you can fix it easily using “Mark Areas to Keep” feature
- If it is unable to detect an area as background even though you wanted it removed from the image, you can fix it using “Mark Areas to Remove” feature
This flexible tool can help you achieve the results you wanted using the options available. Avoid image with very poor contrast as that will consume a lot of time in editing background. Let us show you how we removed background from the image shown above.
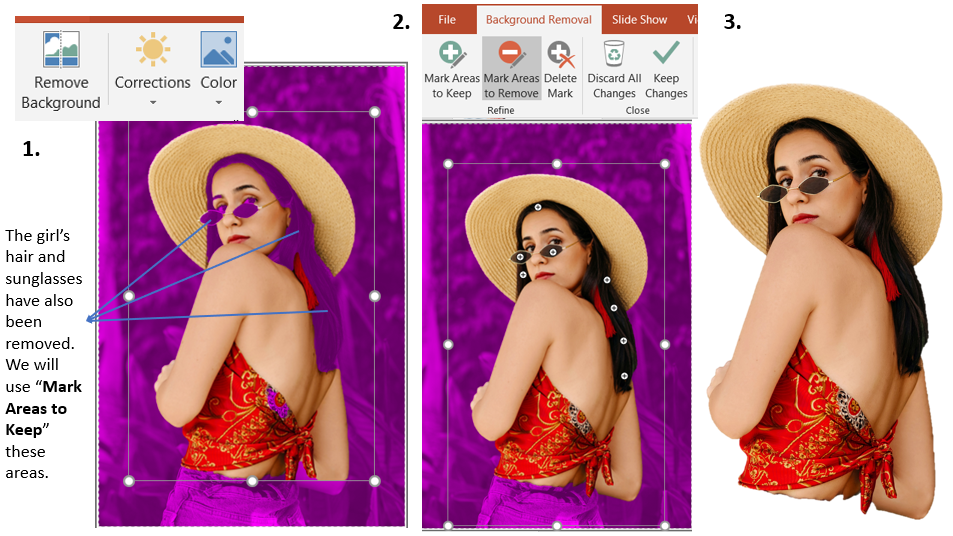
Step 4: Place the Cutout over the Shape & Crop the Cutout
Since, we want the image to pop out of the frame, we are going to use the above created cutout (step 3) to achieve that purpose. How? By cropping the areas we need and superimposing over the fragmented image and shape (created in step 2).
Check out the screenshot below for better understanding –
- We need to add the head area (top portion) and the shoulder area (left portion). We are deliberately going to leave out the right area for artistic effect.
- We will bring that cutout image (created with Remove Background)
- Place the cutout image over the fragmented image (ensure it aligns perfectly with the fragmented image)
- Crop the topmost area and superimpose it over the fragmented image
- Take the cutout image again and crop the left area and superimpose it over the fragmented image
- Your “out-of-the-box”, interactive effect is complete!

The final design:
 Download the Creative PowerPoint Slide
Top Interactive Designs to Add Life to Your Presentation Slides:
Interactive Slide Design #1
Download the Customer Persona Template
Interactive Slide Design #2
Download the Basketball PPT Slide Interactive Design
Interactive Slide Design #3
Download the Above Creative PPT Slide
Interactive Slide Design #4
Download the Baseball PPT Slide Interactive Layout
Interactive Slide Design #5
Interactive Slide Design #6
Download the Skating PPT Slide Interactive Graphic Design
Interactive Slide Design #7
Download the CSR PowerPoint Design
Interactive Slide Design #8
Download the Run Athlete Presentation Slide
Interactive Slide Design #9
Download the Workplace PPT Slide Interactive Graphic Design
Interactive Slide Design #10
Download Entrepreneur PPT Slide Interactive Effect
Interactive Slide Design #11
Download the Rugby Player Slide Design
Interactive Slide Design #12
Download the Beach Travel PPT Slide Interactive Design
Share with us your feedback in the comments below!



 Customer Reviews







![[Updated 20] Top 20 Robotic Process Automation (RPA) Templates To Automate Your Business Tasks Efficiently!!](https://www.slideteam.net/wp/wp-content/uploads/2020/09/size1001-436-25-335x146.jpg)


