Often, you need to create a quick, single page promotional flyer for your business. There is no time to hire a professional graphic designer to create a multi-fold sales brochure. At the same time, you cannot create just about any amateur design that will create a poor impression of your brand in front of the customers. In such a scenario, turn to the most familiar and user-friendly tool to churn out an impressive business flyer - PowerPoint!
Forget fiddling endlessly with Photoshop or other advanced design software. PowerPoint is not only simple but has all the necessary, powerful features needed to create a business flyer with a brilliant design. In this tutorial, we’ll walk you through quick, easy steps to create amazing flyers in just 5 minutes.
All we need is from you is to get ready with your text, images, and contact details. We’ll together convert all the information into a convincing pitch by creating a professional layout in PowerPoint. In the end, no reader can guess whether your business flyer was created by you in PowerPoint or in CorelDraw/Photoshop by a graphic designer.
What We Will Learn to Create in this Tutorial
Advantages of Having a Business Flyer
1. High Readability: Since business flyers are usually single-page designs, the audience can quickly read the content and know about the company’s products or services. Multi-fold brochures, on the other hand, contain more content and take up a lot of time for reading. The single-page norm for a flyer does not mean you are bound to follow it; you can have it printed on both sides if you wish.
2. Cost Effective: Since printable flyers are mostly designed on A4 size paper, they are cheaper in comparison to brochures. Again there is no hard and fast rule for sticking to A4 size. You can keep it as big as you want. Needless to say, you would be going in for full-colored printing since a flyer has to be attention-grabbing. If you use thick paper for printing to increase its shelf life, that would increase the cost too. Despite all that, flyers remain one of the most cost-effective marketing collateral tools to promote your product or service.
3. Wide Distribution: Being cost-effective, they can be distributed to any number of audiences at a conference or trade show. That increases your brand visibility in the market.
4. Easy to Create: As we said above, you can create a business flyer on your own using good old PowerPoint. That is what we are going to teach you in this article.
Quick Steps to Create A Flyer (Single-Page Brochure)
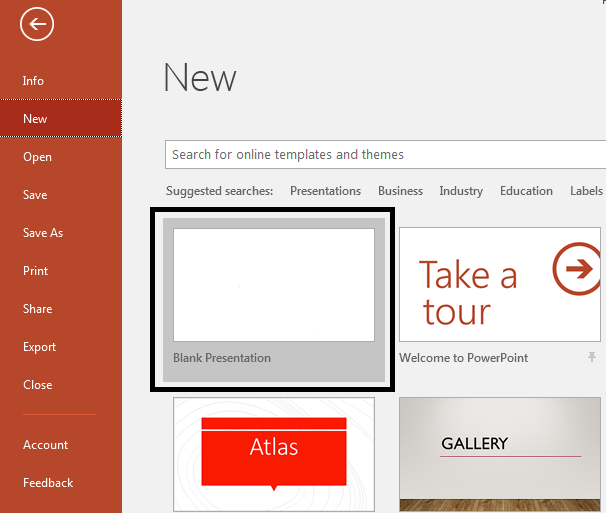
Step 1 - Choose a Blank Presentation
It’s better not to start with a default PowerPoint template as that might limit your options. Go for the blank presentation layout when you open PowerPoint.
Step 2 - Set up the Slide Dimensions
Always customize your slide dimensions as per your requirements first and then start designing. Changing it later would spell chaos as you would be busy enlarging or minimizing the slide elements and thereby distort the quality.
Since usually business flyers are designed in A4/Letter-sized paper dimensions, we will be using the same for our tutorial.
P.S. Letter-sized paper is used in the US and Canada. So, if your audience is clients from the US and Canada, you can use the Letter-sized paper (8.5 x 11 inches). Or if your clients are from other countries, you can use the international standard A4-sized paper (8.27 x 11.69 inches).
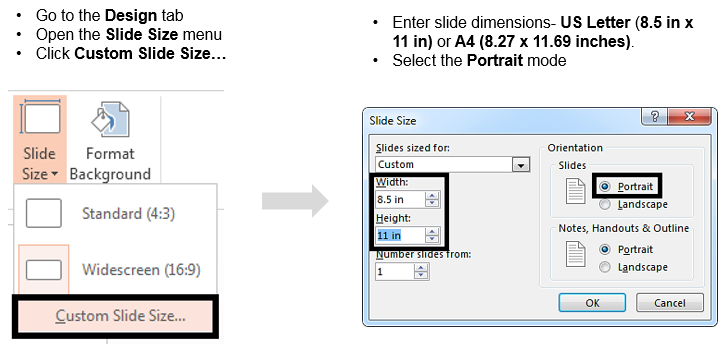
To customize the slide dimensions, follow these steps:
- Click the Design tab
- Go to the Slide Size button and open the drop-down menu
- Click the Custom Slide Size… option (see the screenshot below)
- We are taking the Letter size for this tutorial. Enter Width value as 8.5 in and Height as 11 in (PowerPoint will automatically change the slide orientation from Landscape to Portrait mode). Alternatively, one can open the "Slides sized for" dropdown menu and choose the A4 or Letter size option. However, you'll notice that PowerPoint does not mirror the true dimensions. If you want the exact dimensions, enter the same manually:
The slide in US Letter size will open on your screen. You can now get started with designing your flyer.
Step 3 - Choose a Stunning Image
A flyer has to be visually stunning so that the audience is tempted to pick it up and read it. Therefore, choosing an impressive visual is even more important than the text you write. Choose a high-resolution image so that it is clear on being printed. Also, pick a visual that instantly communicates your business industry and function.
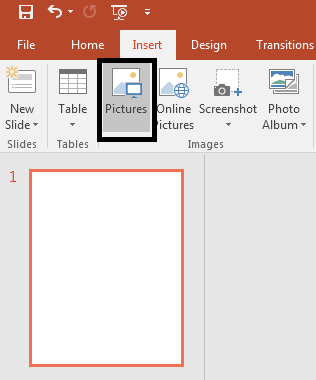
Once you have chosen the image, insert the same in your slide. Go to the Insert tab and click the Pictures button to add the image from your system onto your slide (see the screenshot below):
If you have downloaded a high quality, large size image from a stock photo website, it will automatically cover a significant portion of the slide. Do not enlarge the image manually as it will lower the quality. If the image is covering only a small part of the slide, that means you have to choose a higher-resolution image.
We have taken the example of Big Data Solutions company over here and chosen an image that immediately tells the reader what the company does.
Step 4 - Fragment the Image
Now, where do we place the heading? Over the image or below it? Both are standard ways of displaying heading. But we do not want to do the same thing. We can add a transparent box over the image and place our heading over there. That might create problems during printing. It’s best the text remains on white background. So what do we do? We fragment the image to create space next to it!
Follow these steps to fragment the image:
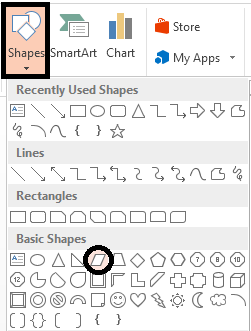
- Go to the Insert menu and choose a shape from the Shapes menu (Let’s choose a Parallelogram for our example)
- Drag the parallelogram such that it covers some part of the image (we placed it on the corner right)
- Drag the yellow handle towards the right as we want little fragmentation on the top half and a more fragmented area at the bottom (see the screenshot below for better understanding)
- Now, select the image first, press Ctrl, and select the parallelogram too
- Go to the Drawing Tools Format tab
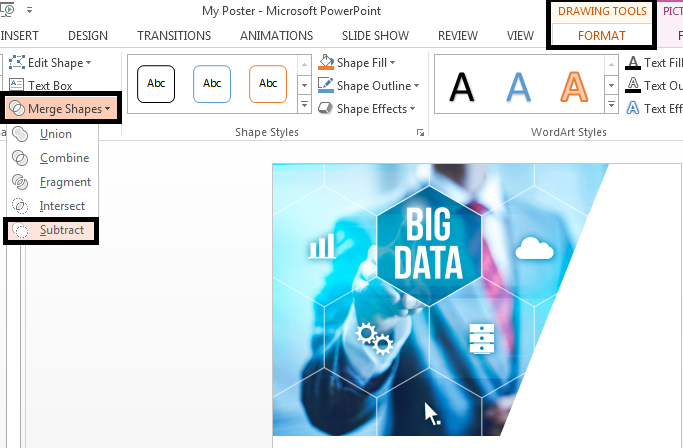
- Open the Merge Shapes menu and click Subtract
You will have a fragmented image like the one above (looks like done in Photoshop, right!) Now, we have empty space to place our heading. But before we do that, we can…
Step 5 (Optional) - Add Shadow to the Image
A small effect can lift up your image and the overall design. The small effect we’ll add over here is adding shadow to the image. It takes just a second to do this.
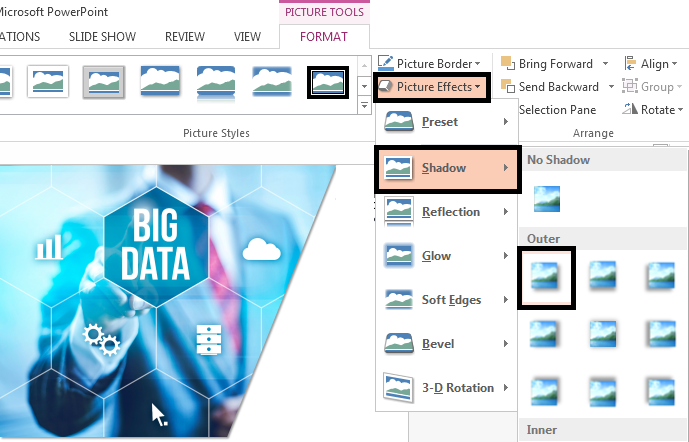
- Select the picture and go to the Picture Tools Format tab on the PowerPoint Ribbon
- Open the Picture Effects menu
- Click Shadow and choose Outer Shadow
Step 6 - Add Company Logo
You must want to highlight your brand logo prominently. The top corner right is the perfect place to put your logo. Now you know why we fragmented only a small part on the top.
Step 7 - Insert a Powerful Heading
The upper fold of the flyer should tell what your company is and what it does in a split second. That is why we chose an image that made the industry and product/service very clear. We also added the brand logo in the top half to highlight the company’s brand signature. Now, we need a heading to reinforce what the company does.
We had fragmented the image to make some space for it; so let’s add it there. Go to the Insert tab and choose Text Box to write your content. Make the heading All Caps and Bold to make it look impactful. Also, the heading has to be large enough to stand out. Take a look at the heading below - the font of the keywords “Cloud-Based Solutions” is 40 point size and the filler words “We specialize in” is 26 point size. The font used here is Helvetica. Sans serif fonts are best for headings and subheadings.
As you can see, we have highlighted the main words in the heading (Cloud-Based Solutions) by increasing its font size and giving it a different color. Such typographic effects add power to your words.
Related Blog: 11 Typography Tweaks And Text Effects To Spice Up Your Presentation Content
Extra Design Addition: Add a Line Below the Heading
- Go to the Insert tab, Shapes menu, and pick the Line shape
- Press Shift to draw a straight line below the heading
- Select the line, right click, and click Format Shape
- A Format Shape window will open on the right
- Choose the line Color of your choice
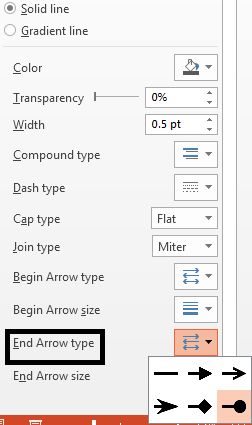
- In End Arrow type, choose the last option - Oval Arrow (see the screenshot below)
Step 8 - Add Company Introduction
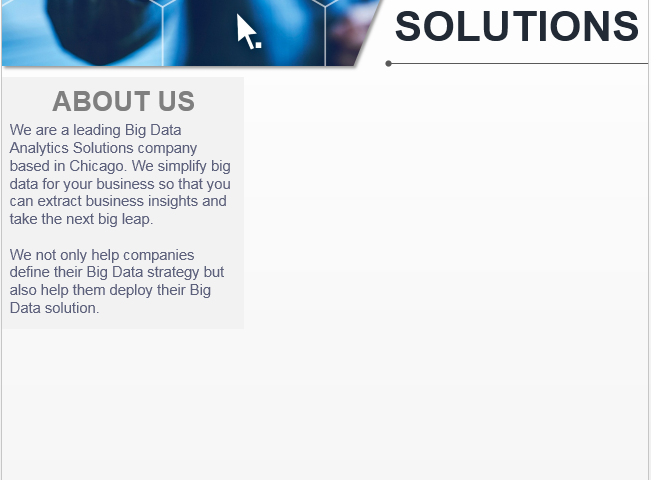
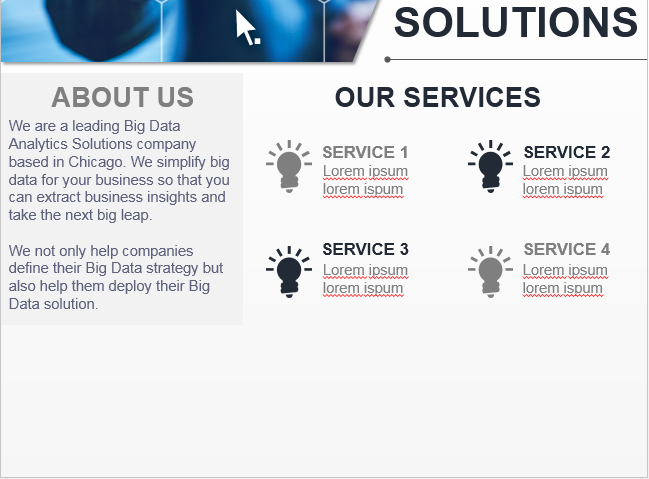
The first half of the flyer has, at a glance, impactfully revealed what the company does. You can now elaborate on your services and strengths in the lower half. Let's get started with a small “About Us” section that elaborates more about your company.
This section is important too. So, add a small box on the left below the image. Go to the Shapes menu again and choose the Rectangle shape this time. Right click on the rectangle and click Format Shape. Give it a light grey solid fill and no outline. Insert a text box and write your content in the same.
Throughout this flyer, we have kept the subheadings size as 26 point and font Helvetica while the font size of body text as 14 points, font Arial.
Step 9 - Highlight Your Business Services
The next task is to pitch the company’s services. To de-clutter the text, we suggest you add icons next to each service. Keep the text as less as possible so that the information is not too heavy to digest. We want to keep the entire reading time on the flyer to be 2-3 minutes at max.
As you can see, we have also alternated the colors - grey and blue - to break the monotony of grey text.
Step 10 - Stress on Your Company USP
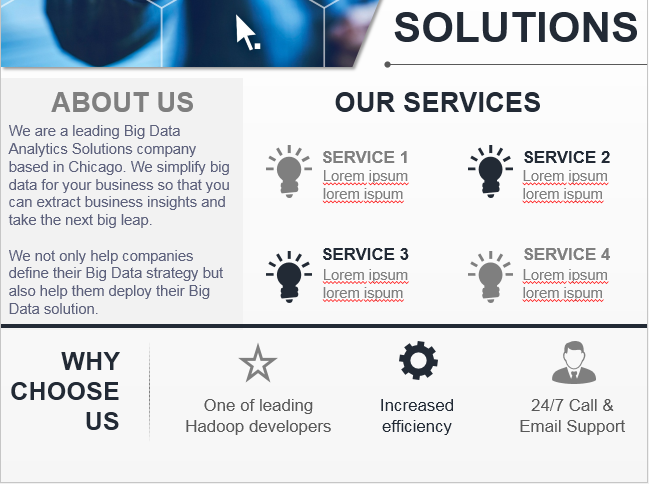
An ideal business flyer should not only give a gist of the company’s offerings but why any client should choose them over their competitors. So, we have added a “Why Choose Us” section below the “About Us” and “Our Services” section.
We have done three things here:
- Added a thick dark blue rectangular strip to separate this section from the above one
- Alternated grey and blue colors to break any monotony
- Added icons for each point to bring visual relief
Step 11 - Place Contact Details in Footer
Last but not the least, you have to add your contact details so that the client can get in touch with you if he is interested in availing of your services. This may be at the bottom but if you miss this, you lose a customer. Very few customers will take the pain to search your name on Google and find your contact details. Share your address, email address, and phone number in the slide footer. Add a rectangular strip behind the text to make the Contact Us section stand out.
How Final Poster Looks
So, we have come to the end of creating an amazing business flyer with your needed brand colors. Save it as a PDF, take a printout, and distribute it to your audience!
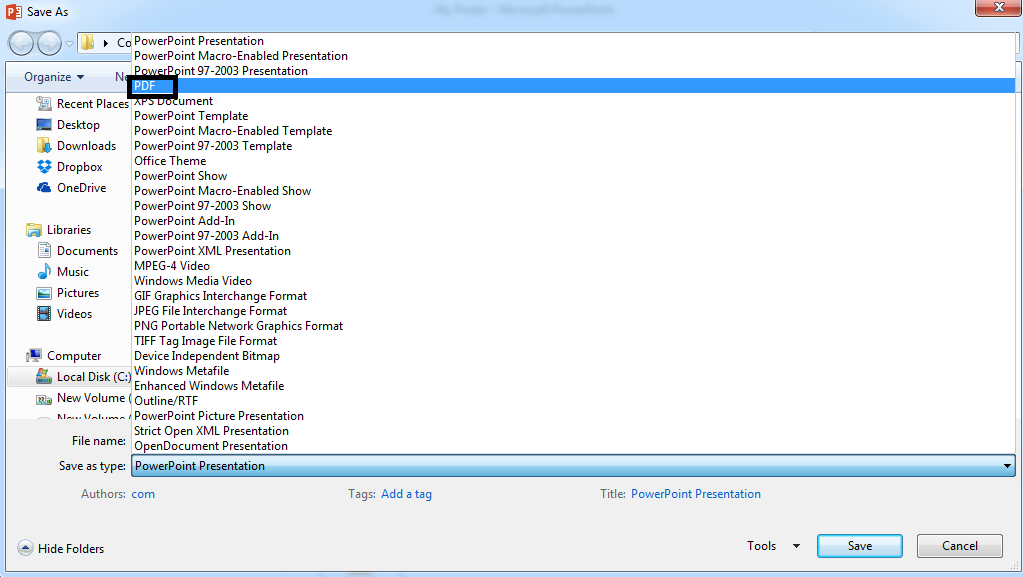
If you do not know it already, here’s how you save your PowerPoint flyer as PDF:
- Click File
- Click the Save As option
- Choose the location for saving the file
- Give the file the name you want
- Open the Save as type drop-down menu and choose the PDF option (see the screenshot below)
- Click the Save button
Get your flyer color printed on a good quality paper and roll it out! All done in a few minutes, thanks to PowerPoint.
Try Out These One-Page Business Flyers
Along with the steps to craft your own business flyers, let us walk you through a few inspirational designs that can be downloaded, edited, and presented on the go! All these flyer designs can be found in our exclusive gallery - all free to browse through!
Template 1
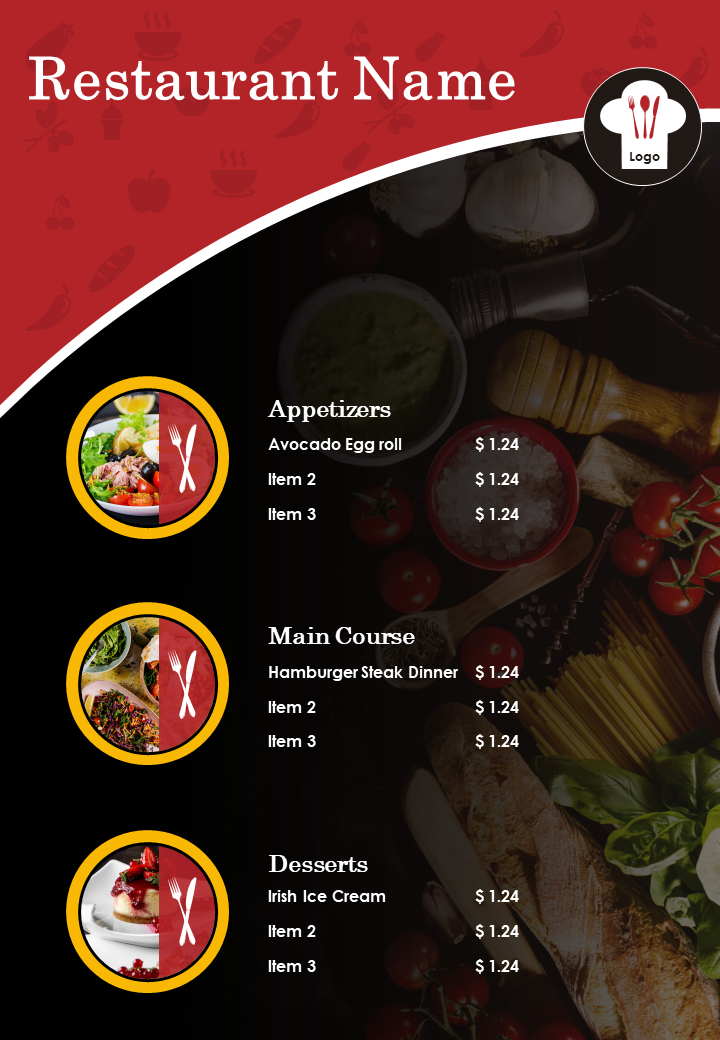
A picture is worth a thousand words and, if used correctly, can help skyrocket your business. Studies show that high-quality images have a 30% higher chance of being shared, which is what this one-page business flyer accounts for. Go ahead and download this restaurant flyer to represent your brand, theme, and services.
Download Food Menu Two Page Brochure Template
Template 2
With health and beauty becoming the primary concerns of every individual, this brochure template helps grow your business. It acts as an inalienable attribute to create a brand name for your business, due to its adaptable content. It also caters to the fast-moving and high-competitive health industry, thus making it an attribute of change and recognition.
Download Health And Beauty Flyer Two Page Brochure Template
Template 3
Present dreamy and picturesque itineraries with this travel brochure. Being a perfect companion for all the travel agencies, this flyer is a must-have to use and download. Traveling for leisure and work is indeed a pleasurable experience, which is increased manifolds with this beautifully-crafted flyer template. So, download it now!
Download Tourism Company Flyer Two Page Brochure Template
Template 4
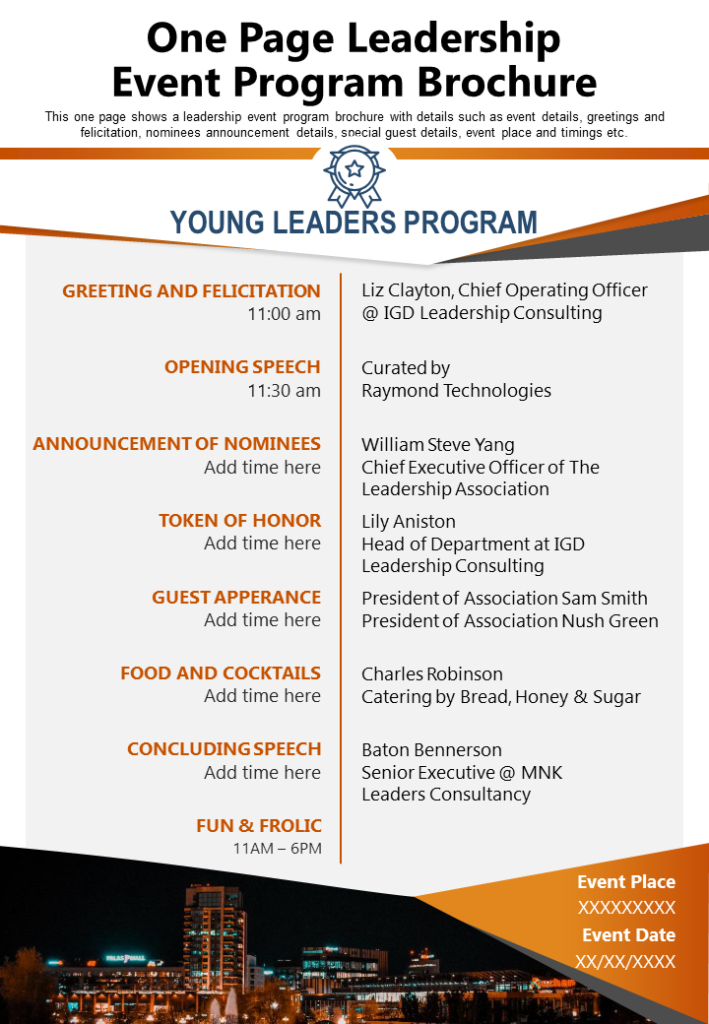
Move out of the spectrum of cut-throat competition and let your flyer do the talking. This brochure template presents a snapshot of the benefits of enrolling in your program. Use it as a bidding attribute for the audience to make well-informed decisions. High-quality content is added for your reference and ease. Therefore, this template is a true inspiration to get yourself started!
Download One Page Leadership Event Program Brochure Presentation Report
Template 5
If your company deals with finance management projects, then this template is an ideal fit for you. Make a good impression and build your brand identity with this flyer template. Manipulate its design multiple times or as you please, as this template is fully editable.
Download Charted Financial Consultant Two Page Brochure Template
Template 6
A well-thought and implemented business flyer/brochure is more than just a few images and information. When done right, it can become your brand’s USP and the main driver of profits. If you are considering adding a flyer mix to increase the popularity of your driving school, consider this template. With a well-structured layout, an image that speaks for itself, and high-quality content, this one-page flyer will help you market your services in no time!
Download Professional Driving School Four Page Brochure Template
Template 7
Leverage your best medical services with this flyer template. A lot of your projects and their acquisition depend upon your brand and its image. A brochure makes an immediate impression on your views thus helping build your brand’s identity. This flyer template is designed to help you demonstrate your core competencies with an accompaniment of a great design.
Download Medical Marketing Four Page Brochure Template
Template 8
Solicit successful bids and raise money for a noble cause with this astounding design. Dig in and let the society take a leap of faith towards a charitable event by deploying this customizable fundraising flyer. This template acts as a marketing tool that can help you reach a broad spectrum of investors, thus making your event a huge success!
Download Fundraising Charity Event Four Page Brochure Template
Template 9
Go Clean and Green! This template helps in the creation and presentation of bifold brochures to sell your eco-friendly services. Keeping your business motto in mind, this template incorporates various colors of environment and conservation, thus acting as a perfect representation of your work. You can manipulate the design innumerable times to make it truly yours. Not only this, it also offers quick download and editing features.
Download Environmental Consulting Firm Four Page Brochure Template
Template 10
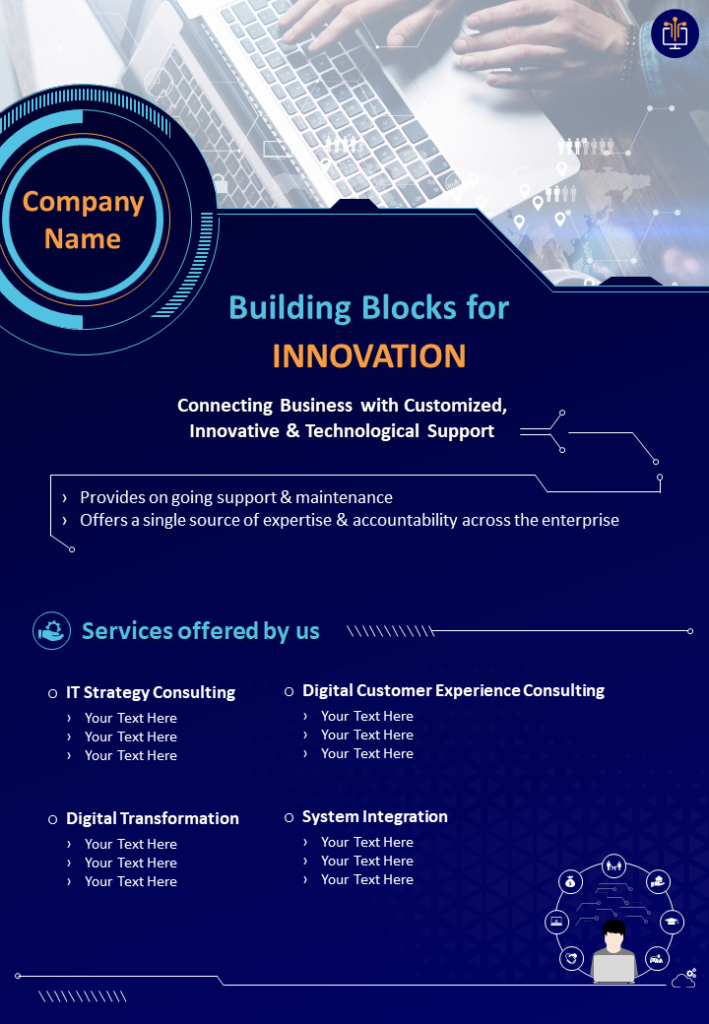
You are the “easy button” when it comes to tech-savvy projects. Let your prospects know the benefits of partnering with your organization to make their tech life less tedious and more rewarding. Modify any component in this flyer template to interpret your business ideas and vision in minutes. Therefore, download now!
Download IT Consulting Company Two Page Brochure Flyer Template
Did you find the tutorial and templates interesting? Let us know your thoughts in the comments below!



 Customer Reviews















![[Updated 2023] 30 Best Editable Flyer Templates For Your Business Promotions](https://www.slideteam.net/wp/wp-content/uploads/2020/09/size1001-436-5-335x146.jpg)

