What differentiates a professional design from an amateur design? The BIG idea or the creative idea, yes. But often, it is the focus on the SMALL details that truly give a design a professional touch.
One such small detail that you can also incorporate in your presentation slides and other designs is a Pattern Background. What’s the big deal about a design background? It is relegated to the background, buried behind the content and is too light to draw any special attention to itself. So why waste so much time in designing it in the first place?
Because in design, everything counts. The full stop or the absence of it, the three dots giving continuity or the exclamation mark screaming for attention, the small icon in the corner of the slide or the shadow you gave to an object...everything counts. Backgrounds, especially pattern backgrounds, add meaning to the slide. It’s function is not just to make the slide look pretty (though it achieves in doing that too) but also to give the slide a visual impetus by giving a context to the message.
If the pattern you choose is relevant to the presentation topic, it adds POWER to your presentation. How? By giving credibility to the message that you put in the foreground. The message sitting on a plain white slide is all right, it is common and there is nothing so special about it. But the same message on a painted canvas has a different personality altogether.
Let’s give our slides the personality it deserves by using creative pattern backgrounds. We’ll show you 7 amazing pattern backgrounds (includes geometric pattern backgrounds and abstract pattern backgrounds) that you can try in your upcoming presentations and also teach you how to create them in PowerPoint without shelling a single penny.
Let’s get started:
Free Pattern Backgrounds for Slides & How to Create Them
#1- Diamond Pattern Background
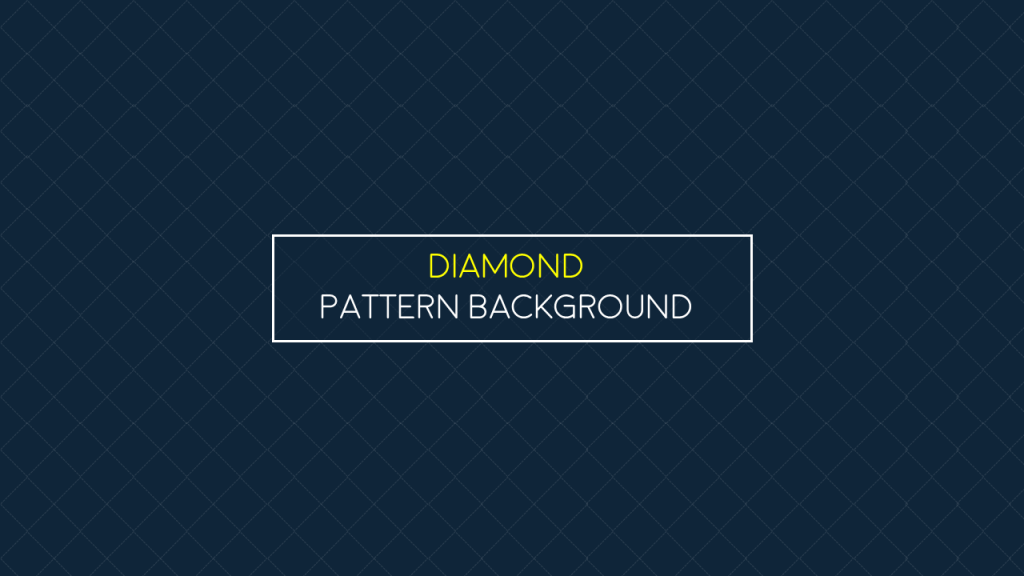
“A diamond is forever.” This rare and beautiful stone symbolizes everlasting. Using this exquisite icon, therefore, gives a classic and “superior” look to the design. The diamond shape provided in the Shapes menu in PowerPoint shows four sides joining together- said to symbolize creativity that comes by joining the four elements of nature- earth, fire, air, and water. Give a rich look to your presentation design with this subtle yet powerful pattern background:
Steps to Create This Presentation Background:
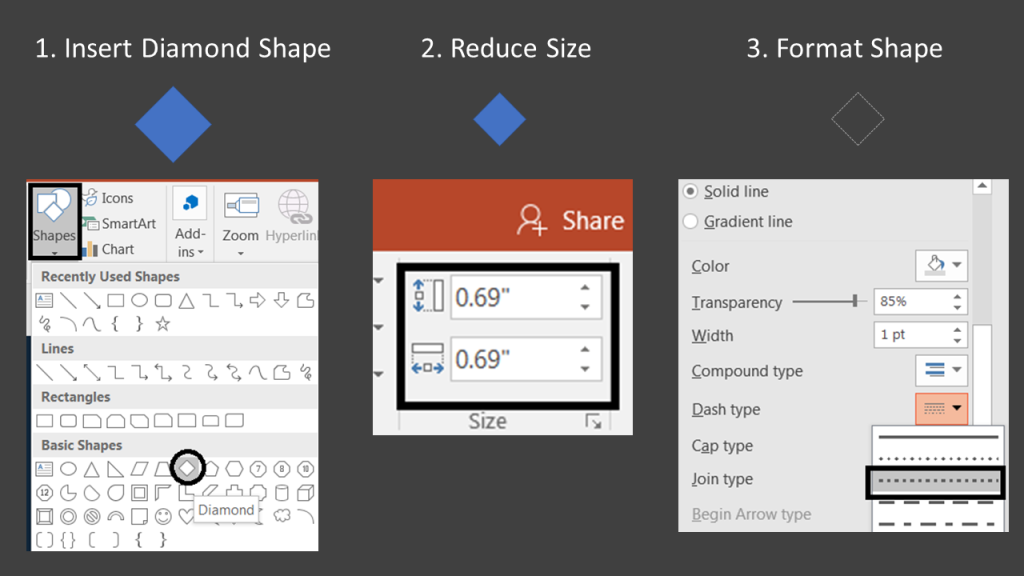
- Go to the Insert tab> Shapes menu> locate the Diamond shape (see the screenshot below)
- Simply click on the slide to have the diamond shape drawn
- Reduce it’s size to .69 from the Format tab
- Right click on the shape and select Format Shape
- The Format Shape window will open to your right. Choose No Fill and a Solid line of the color of your choice. Under Dash type, select the Square dot option (see the below screenshot)
We now have to create a row of diamonds from the left corner to right corner of the slide. Rather than copy and paste the diamond shape, easier way is to press Ctrl and Shift together and drag the diamond and place it next to the previous. When you have placed 3-4 diamonds, group them by using the shortcut- Ctrl + G and drag and place them next to the previous group. This will help you create the row faster. When you are done, group the row by using the Ctrl + G shortcut again.
Now, press Ctrl and Shift and drag this row. Place one row below touching the above row and do it till your complete slide is covered with diamond rows (see screenshot below for reference):
Group all the rows together and your pattern background is ready! You want your text to be readable, so give it a transparency level as per the requirements. The transparency level can be s high as 80-90%. To give this transparency, right click on the pattern > Format Shape > Line > Transparency.
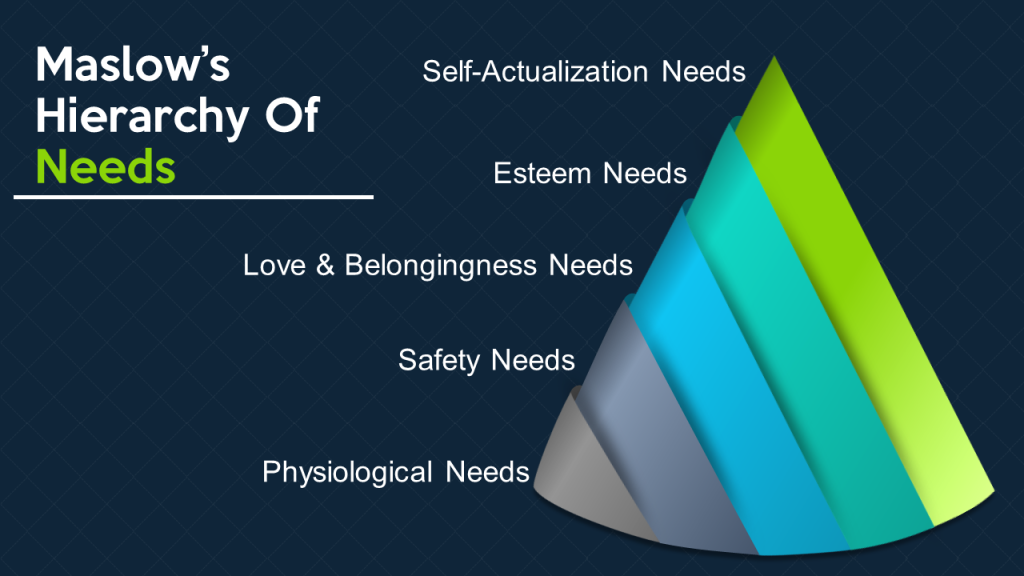
Another technique is to create pattern on the blank white slide. Add a colored rectangular shape over the slide (grey or blue or whatever presentation colors you use) and give the rectangle transparency. The effect will be the same. You can now use this background to create artistic slides like the one below:
Without the pattern, the slide would still have looked great. But pattern adds a subtle but powerful effect to the slide. In fact, it enhances the meaning of the audience. The majestic pyramid and the majestic diamonds complement each other. The audience won’t know why they love the slide so much, but you know. Each element, as small as a slightly visible pattern or the line below the heading, adds value to the overall design.
#2- Hexagon Pattern Background
Hexagon is another shape that attracts a lot of interest in symbolism. It indicates balance and unity. This geometric shape with six edges and six vertices has inspired in architecture design, tattoos, art and fashion. Using this presentation background will lend credibility to your design and the content. Here’s how an interwoven hexagon pattern looks:
Steps to Create this Pattern Background:
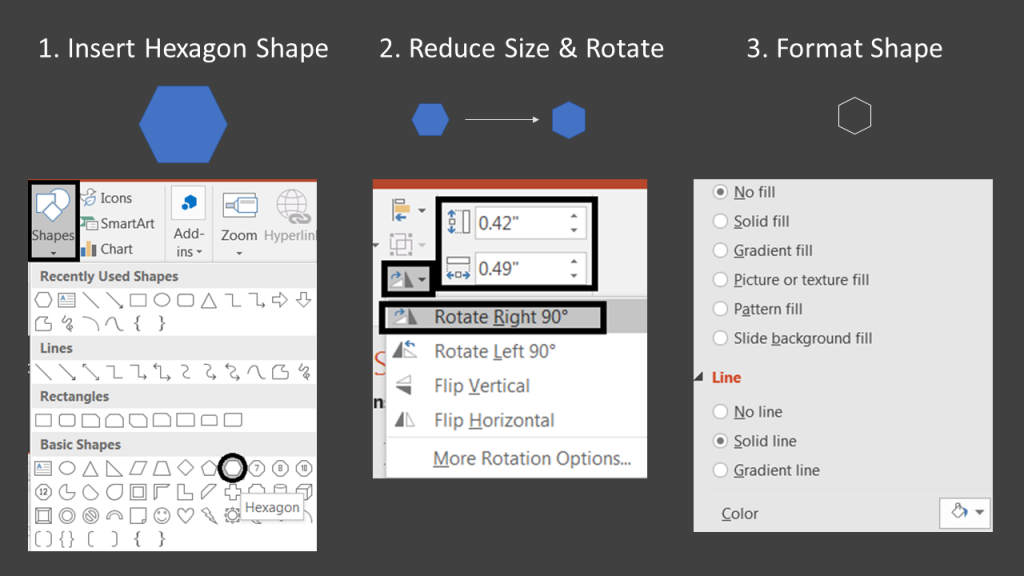
- Go to the Insert tab> Shapes menu> locate the Hexagon shape (see the screenshot below)
- Simply click on the slide to have the hexagon shape drawn
- Reduce it’s size to .42- Shape Height and .49- Shape Width from the Format tab
- Open the Rotate menu and click Rotate Right 90 to have the pointed edge of the hexagon facing upward (see the screenshot below)
- Right click on the shape and select Format Shape
- The Format Shape window will open to your right. Choose No Fill and a Solid line of the color of your choice
Press Ctrl and Shift to create a row of hexagons from corner left to corner right (step 4 in the screenshot below). Use the Ctrl + G shortcut to make the entire row one object. Unlike the diamond pattern, in hexagon we won’t put each row directly below the other. Copy the top row and place the duplicate in such a way that each hexagon covers the gaps of the above row (see step 5 in the screenshot below for quick understanding):
Do this for all the rows below and your pattern background will finally look like this:
Group all the rows and give the pattern transparency so that your message stands out from the background. Here’s a business slide that applies this background to create an amazing effect. The consistency in the pattern and the shape used for the image helps create the visually stunning effect:
#3- Networking Pattern Background
Any Information Technology presentation or a supply chain presentation showing networking among different systems can apply the networking pattern to turn a dull presentation into a visually impactful one. Whether you are talking about global communications or social media networks, this pattern can help you establish the context and add power to your content.
Steps to Create this Pattern Background:
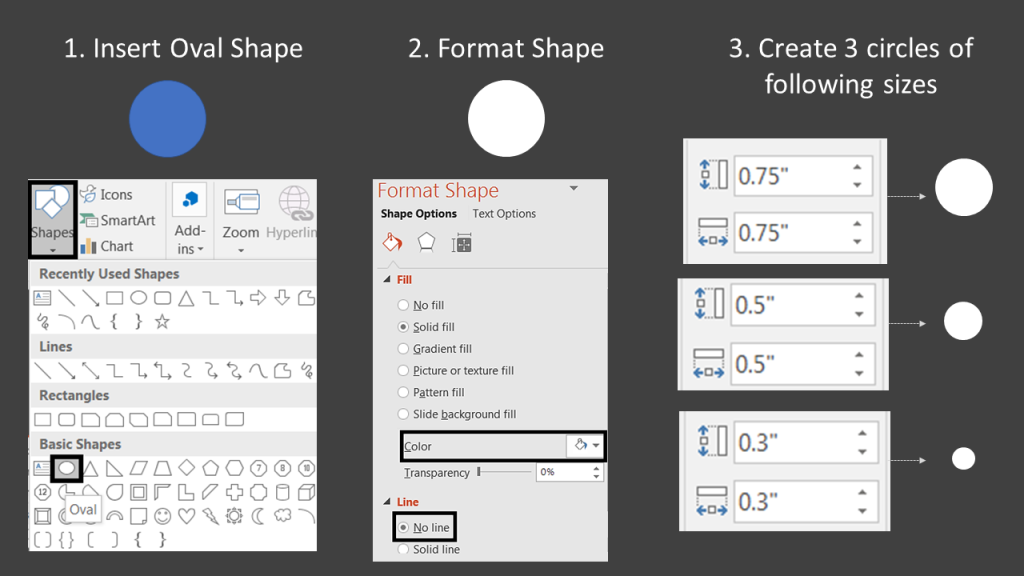
- Insert the Oval shape from the Shapes menu (Insert tab)
- Press Ctrl and Shift to draw a perfectly symmetrical circle on the slide or simply click on the slide and a perfectly symmetrical circle will appear on the slide
- Right click on the circle > Format Shape > Solid Fill- White > Line- No line
- Create 3 circles of varying sizes. Go to the Format tab and in the Size group, specify the following dimensions of each circle- Circle 1, Height and Width- 0.75, Circle 2- 0.50 and Circle 3- 0.30 (see the screenshot below for reference)
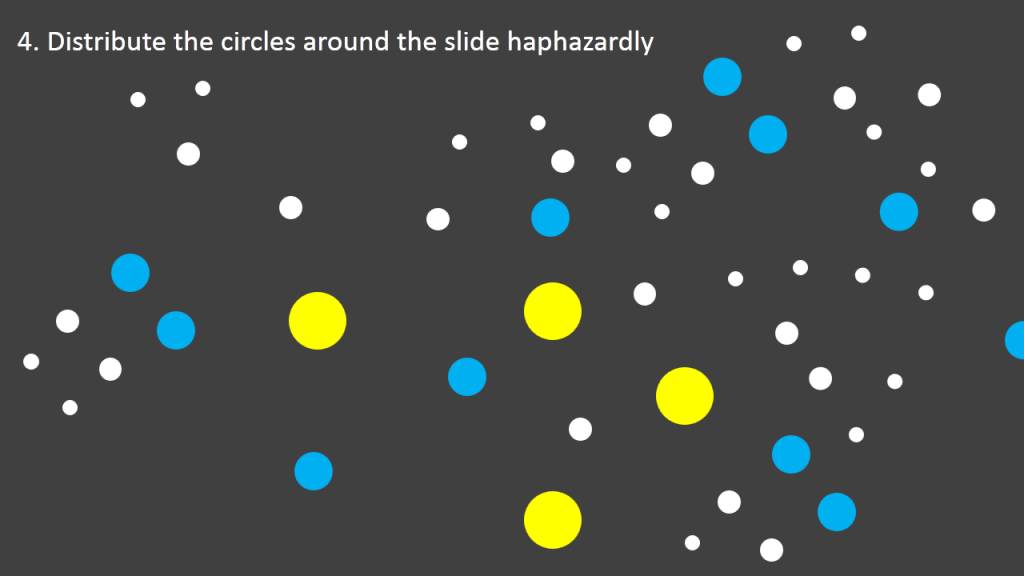
Distribute the circles across the slide in a haphazard manner like we did below (circles highlighted yellow and blue just for reference). The Circles 1 have been colored yellow just for your ease of understanding. Keep around 4 or 5 of circles 1 around the slide. The Circles 2 have been highlighted blue just for reference. Distribute around 10-12 of these circles around the slide. The color of circles 3 has not been changed and their number is almost the double of circles 2. So, your slide will look like a messy arrangement of bubble shapes like the one below:
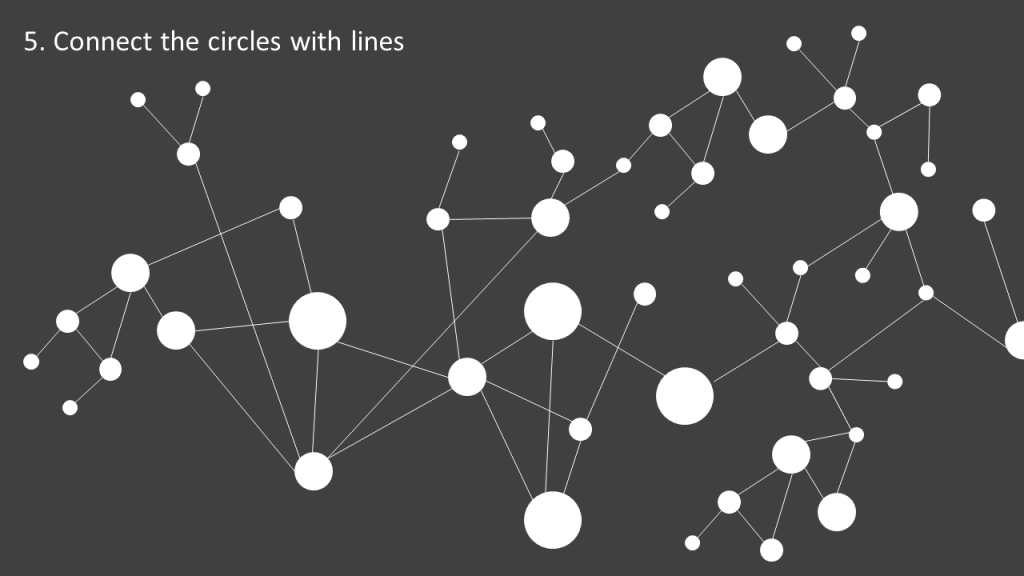
Next, connect all the circles with a line. Go to the Insert tab > Shapes menu and locate the Line. From the Format Shape menu, you can customize the color of the line. We have kept it white. Start connecting 2 circles with a line. When you connect circles, you’ll find PowerPoint highlights the boundaries of the circles. This is to help you connect the circles easily and more effectively (see the screenshot below):
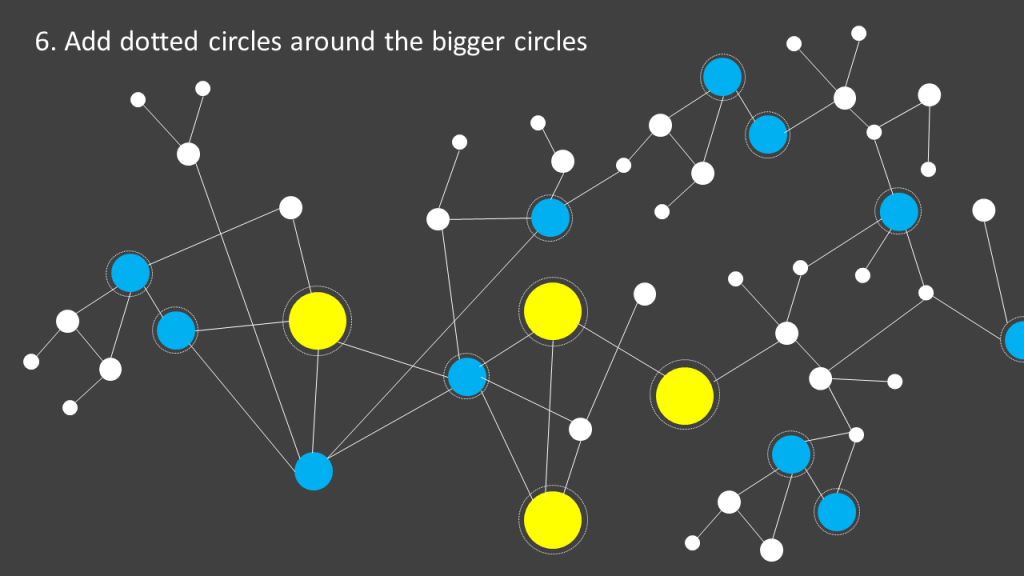
To make the pattern look even more striking, we’ll add dotted circles around the bigger circles (circles 1 and 2 highlighted yellow and blue respectively just for reference). Creating dotted circles is very easy- Insert the oval shape > right click on the shape > Format Shape > No fill > Solid line > Width- 1 point > Dash type- Dotted round. This is how the pattern now looks:
Obviously, we have to give the pattern a transparency so that the content we put in front is easily readable. On way is to give the circles and lines a transparency level of 80-90% from the Format Shape window. Second and easier way is to insert a rectangle over the complete slide and give it a solid fill color of your choice. Give the rectangle transparency which will automatically make the pattern fade in the background.
To create a breathtaking Title slide or section header slide, you can add a gradient background over the pattern slide and make the slide look as if designed by a professional designer:
Want to download this amazing gradient background for your presentations? Download this and 7 amazing gradient backgrounds for free from the blog post below:
Download Gradient Backgrounds for Free
Here’s the pattern background lending visual support to a Supply Chain Management slide:
#4- Circular Pattern Background
Circle represents infinity, wholeness, totality and eternity. But it can also be perceived as boring. So we won’t be taking a regular circle. We want to create dynamic slides. Let’s take an arc instead and extend it so that it appears to be a broken circle. Here’s such a pattern background (looks celestial, doesn’t it?)
Steps to Create this Pattern Background:
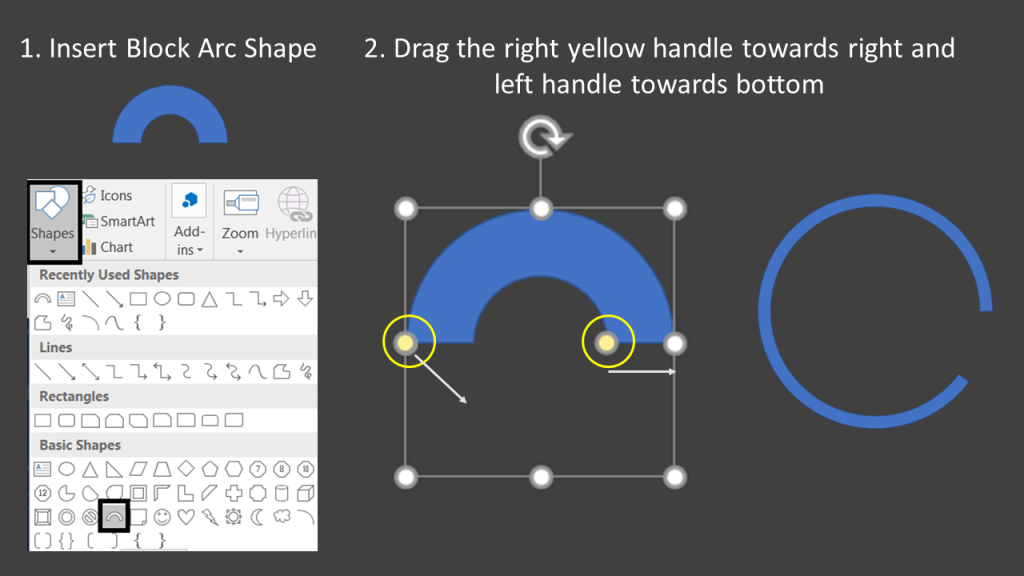
- Insert the Block Arc shape from the Shapes menu (under the Insert tab)
- On selecting the shape, 2 yellow handles will appear
- Drag the right yellow handle towards the right direction which will make the arc thickness lesser
- Drag the left handle towards bottom and towards the first yellow handle which will make the arc’s length bigger (see the screenshot below):
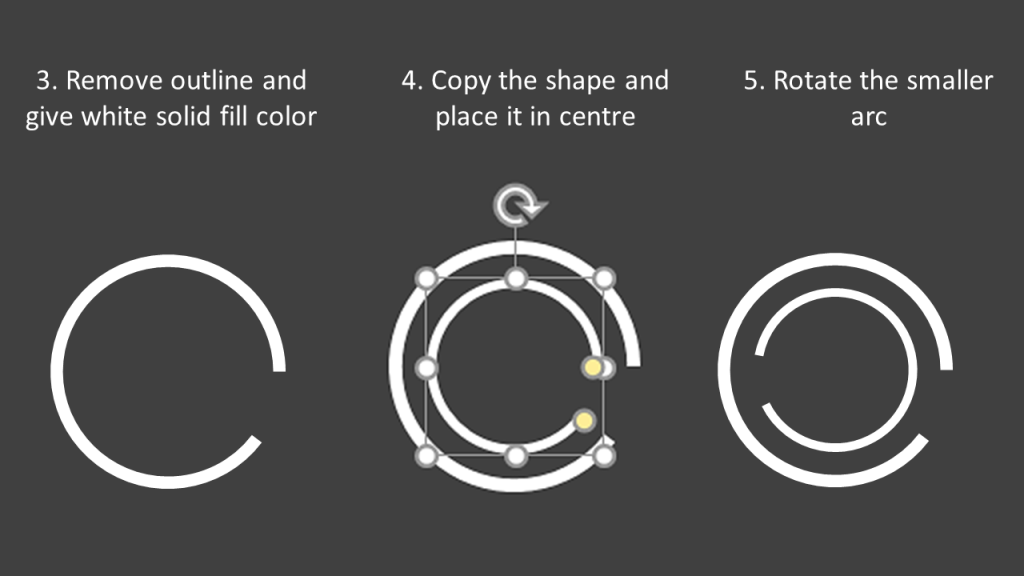
Right click on the arc > Format Shape. Remove the outline from the arc and make the solid fill color white. Duplicate the shape using Ctrl C and Ctrl V shortcut. Reduce the size of the duplicate arc and place it in the centre of the bigger arc (see the screenshot below). Rotate the smaller arc using the rotation handle on top such that the gaps of the arcs are facing in the opposite direction:
Group the bigger and smaller arc by using the shortcut- Ctrl + G. Copy this grouped object and reduce its size using the sizing handles. Distribute all these arcs around the slide to have your pattern design ready in 2 minutes! Don’t forget to give the pattern a transparency of 70-80% for easy readability of the content you put on the slide.
It’s not necessary to use pattern across the complete slide canvas. You can put it in one half or area of the slide. Here’s a channel marketing slide that uses this pattern:
#5- Growth Trend Pattern Background
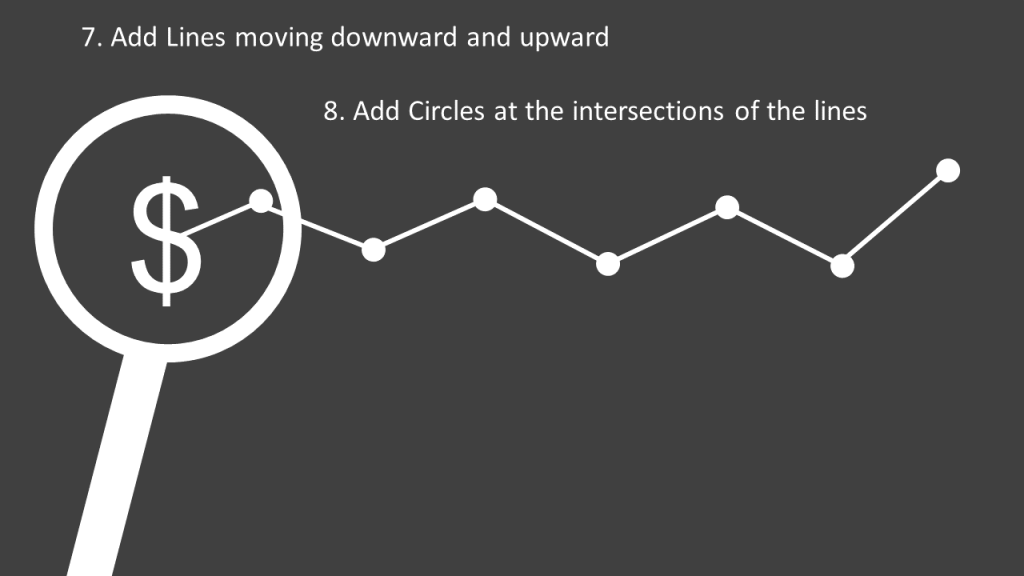
Quarterly Business Review, Quarterly Sales Review presentation, Annual Report, market analysis deck or any presentation that talks about trends can benefit from growth pattern background. This pattern consist of a magnifying glass that shows the focus on market and a line graph showcasing a trend. Not is it just very easy to create but also lends credibility to your presentation.
Steps to Create this Pattern Background:
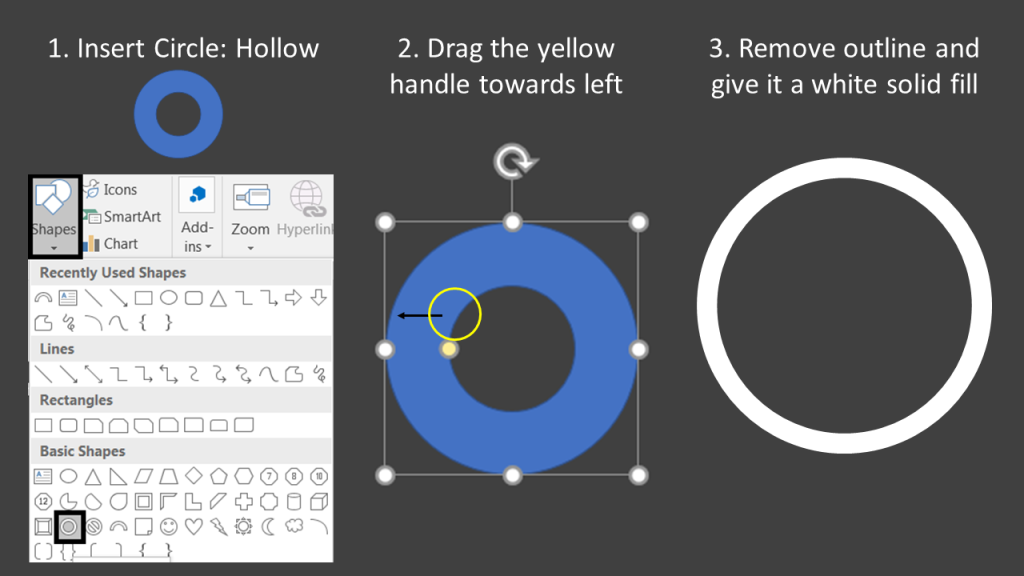
- Insert the Circle: Hollow shape from the Shapes menu (under the Insert tab)
- Select the shape and drag the yellow handle towards left to increase the hollow space and reduce the width of the circle (see the screenshot below)
- Right click on the shape > Format Shape > Solid Fill > Color- White > Line- No line
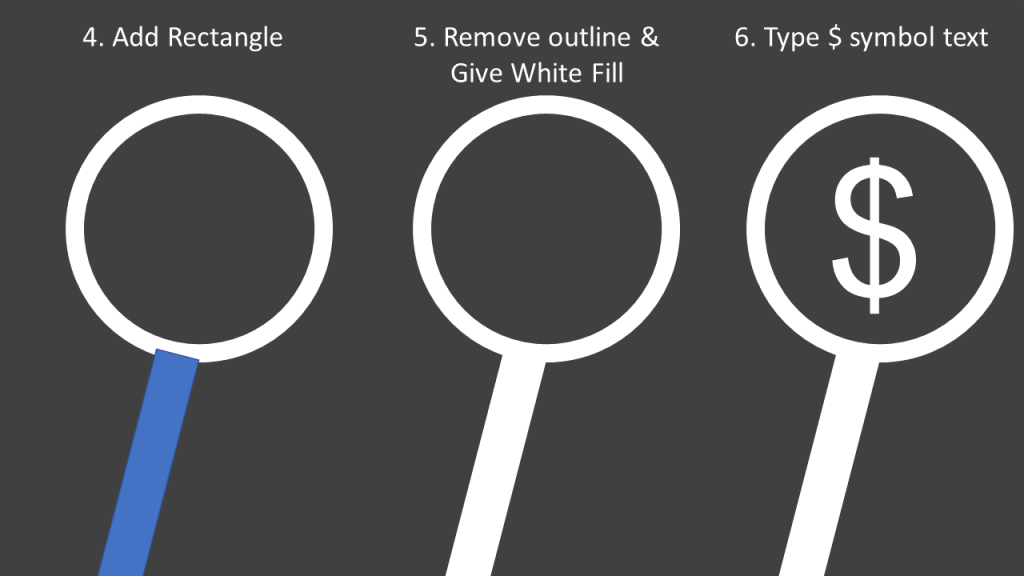
We now need to create a handle so that the shape looks like a magnifying glass. To do so, add a rectangle from the Shapes menu and place it below the hollow circle. Tilt it a bit using the rotation handle on the top. Give the same formatting to the rectangle as given to the circle- white fill and no outline. Lastly, add a $ text symbol in the centre of the circle. Press Shift and 4 to add the $ sign right from your keyboard.
Learn to Create More Magnifying Glass Designs
We now need to show an upward moving line graph. To create, simply insert lines from the Shapes menu. Give it a 4 point width and white color from the Format Shape window. Place lines downward and upward alternatively to show a rising and falling graph. The last line should be facing upward if you want to show a growth trend through your pattern. Also add circles at the intersection of two lines to make the line graph more visually attractive. Your pattern background is now ready!
Add a transparent layer over the pattern to easily display your presentation content. You can also minimise the pattern as done in the slide below:
#6- Gears Pattern Background
Any business presentation outlining operations and procedures can look impressive and professional by using the gears pattern background. Since gears represent teamwork, interlinked processes, unity in diversity, smooth operations and so on, they are a perfect fit for many presentations and industries. Either you can show multiple gears interlinked together…
Or a single large gear to keep the pattern minimal like the one below:
Steps to Create a Gear in PowerPoint:
We have a complete post on how to create Gears in PowerPoint. Here’s a quick summary of the steps to create a gear in just 2 minutes:
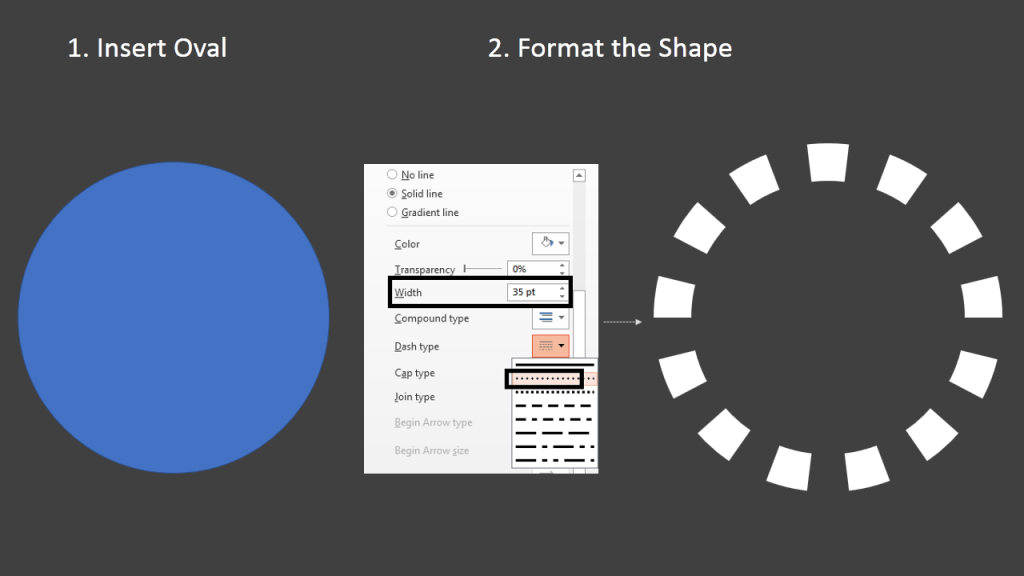
- Insert the Oval shape from the Shapes menu (Press Shift to draw a perfectly symmetrical circle)
- Right click on the circle and click Format Shape
- Under Fill, select the No fill radio button
- Under Line, select Solid line > Color- White
- Increase the Width of the line to 35 points
- Change the Dash type to Round Dot (see the screenshot below)
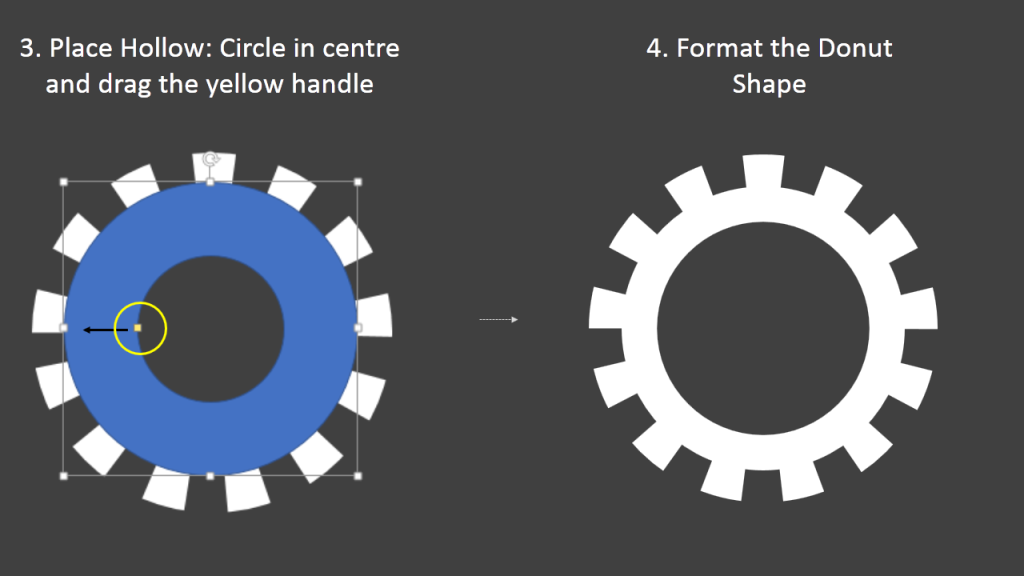
- Add the Hollow: Circle shape from the Shapes menu
- Place the donut in the centre of the dotted circle
- Move the yellow dot to left to adjust the thickness (see the screenshot below)
Group the dotted circle and the donut using the shortcut Ctrl + G and the gear is ready! Use it to turn boring operational slides into exciting ones like this:
#7- Lines Pattern Background
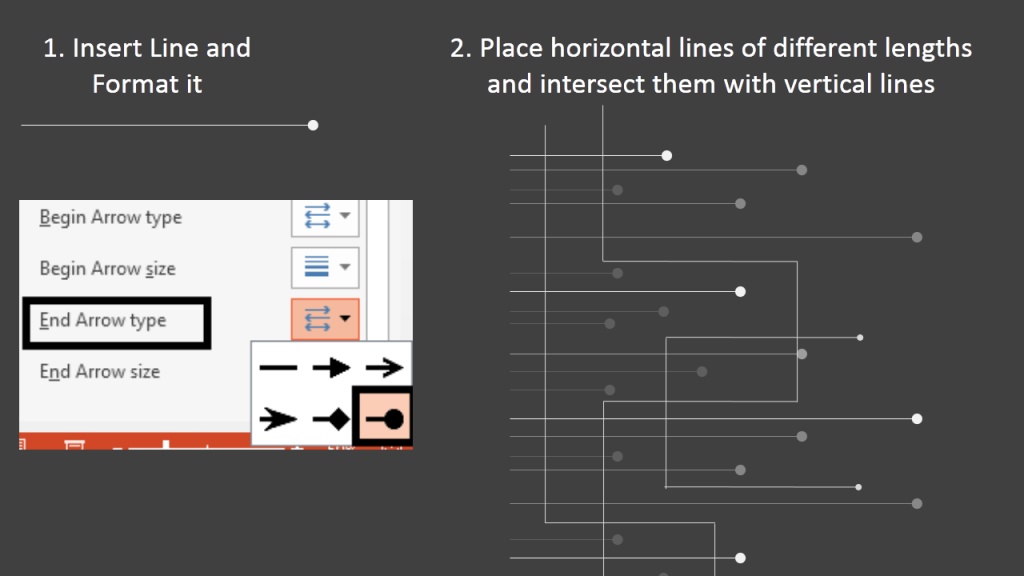
Abstract pattern backgrounds can also light up your slides and give a creative look to your presentation. One such abstract pattern that you can easily create yourself is with lines. Criss-crossing lines signify a network and a complex web of relationships and processes.
Steps to Create this Pattern Background:
- Insert Line from the Shapes menu (Press Shift to draw a straight line)
- Right click> Format Shape
- Go to the Line menu > End Arrow type > choose the Oval Arrow option
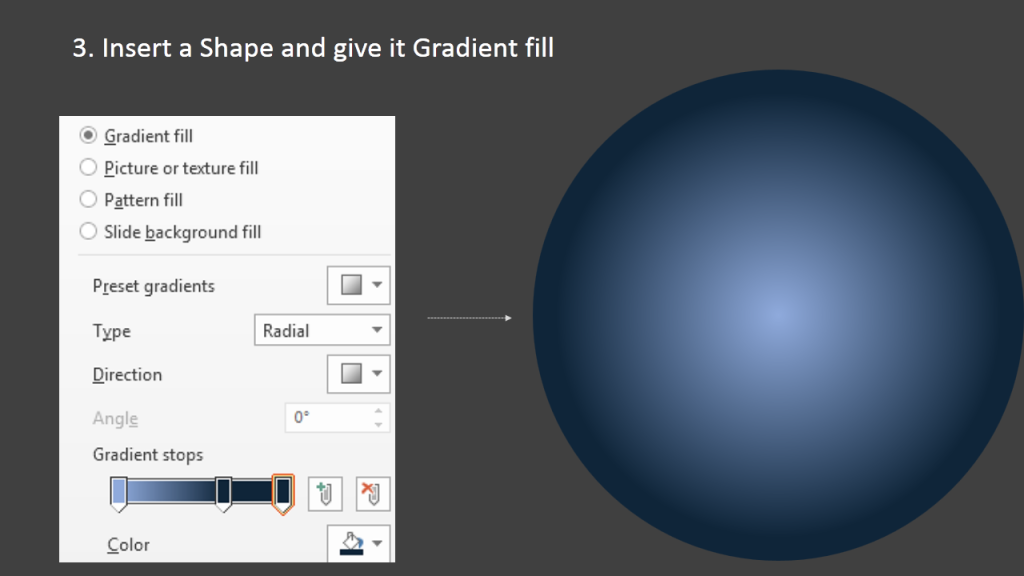
Add a gradient effect towards the left corner of the slide. To do that, insert any shape from the Shapes menu (we chose the Oval shape). Right click on the shape and click Format Background. Select the Gradient fill option> Type- Radial > Direction- From centre (see the screenshot below). Colors of the background should match the slide background. Place this shape towards the corner of the slide.
The abstract line pattern is ready that you can use in any presentation. Here’s an example:
Which pattern background did you like the most? Leave your feedback in the comments below for we’ll love to know if you found this presentation tutorial useful.



 Customer Reviews

