In the previous post, we showed you how to create a beautiful Cover Slide Template using just Shapes.
Since the cover slide is the first impression on the audience, you need to invest time and effort in creating a good one. An image does half the work for you in accomplishing that. As humans, we are natural visual learners. We have grown up learning about this world first through visuals and then through words.
If you keep a block of text and an image next to each other, by instinct our eye will be drawn first towards visuals. It establishes a context. It makes any concept easier to understand. It is also remembered long after the talk is over.
Taking advantage of the power of visuals, today we will learn to create a stunning cover slide template for any corporate presentation using image as well as shapes. To make it look as though designed by a professional designer, we will split the image using a very simple presentation hack that we’ll teach you in this tutorial. In the end, you will have created yourself a presentation template like the one below:
What you will learn to create in this tutorial:
You can use this template with any image and can use this for creating section header slide as well as text slides.
Download the Cover Slide and the Complete Deck
5 Simple Steps to Create Professional Cover Slide Design in PowerPoint
Step 1- Insert Picture
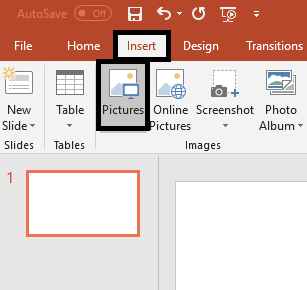
You would know this already but for the newbies, go to the Insert tab on the PowerPoint ribbon and click the Pictures button. Locate the file on your system, select it and click Insert.
For representation purposes, we have chosen a business meeting image. It is not necessary for the image to cover the entire slide area. As you can see in the slide below, our image covers roughly 70% of the slide which is allright.
Step 2- Add Diamond Shapes
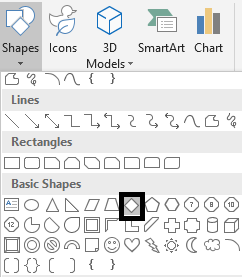
Now, let us move to the Shapes part. Go to the Insert tab again, locate the Shapes menu. Go to the Basic Shapes section and choose the Diamond shape as highlighted in the screenshot below.
Place the diamonds at equal distance to make a diagonal row. To make sure the spaces are equal between each diamond, select all the four diamond shapes, go to the Format (Drawing Tools) tab on the PowerPoint ribbon, open the Align menu and click Distribute Horizontally and next Distribute Vertically.
As you can see in the slide above, the first and the last diamond are falling outside the slide area. This is deliberate to give a creative effect.
Don’t forget to select all the shapes, right click, Format Shape and remove the boundary line from all these shapes by selecting the No line radio button (under the Line menu). The exact dimensions of the diamond shape that we have used are, Shape Height - 6.65 cm, Shape Width - 6.64 cm.
Step 3- Create Parallel Rows of the Shape
Just copy paste to create rows above and below the row you just created. Use your creative judgement to set all rows diagonally and parallel to each other. If you feel the spaces are uneven, select them, go to Format - Align- Distribute Horizontally.
The shapes can go outside the slide area as you can see below:

Step 4- Merge the Image and Shape (One by One)
We will now cut the image in such a way that the diamond shapes are filled with the image below it, while everything else is cut off. PowerPoint lets you do that in just a minute. But you need to intersect the image and the shapes one by one.
So before we begin, copy the image (Ctrl + C) as we will have to paste it again and again till all diamond shapes are intersected.
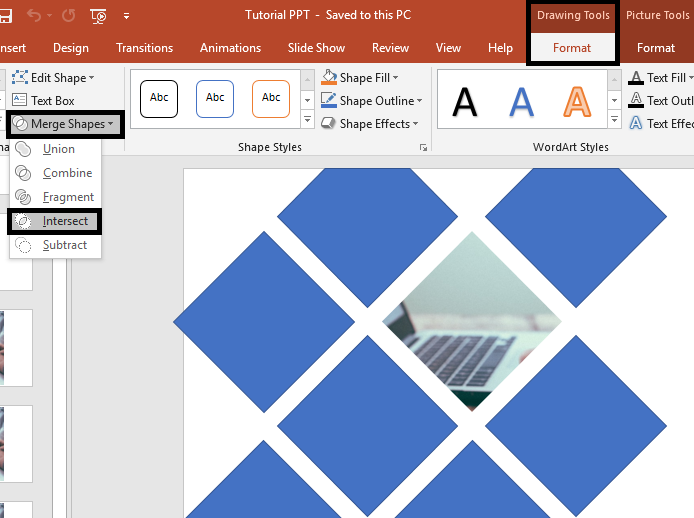
- Now, select the image first, then the diamond shape
- Go to the Format (Drawing Tools) tab
- Locate the Merge Shapes menu
- Click Intersect (see the screenshot below)
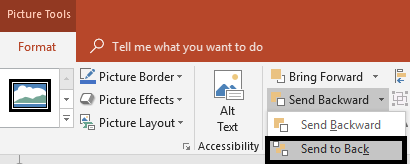
As you can see above, one of the diamonds has been intersected with the image underneath it. We need to bring back the image. Paste the image that you had copied before on the slide. The pasted image will, however, block the view of diamond shapes. So, select the image, go to the Format (Picture Tools) tab, locate the Send Backward menu and click Send to Back (see the screenshot below).
Now, repeat the process - Select the image first, next the diamond shape, go to Merge Shapes and click Intersect. Repeat again till all diamonds have been intersected and you have a split image design like the one below:
Step 5- Add Triangles to Complete the Pattern
To complete the diagonal rows on the left, we will add diamond shapes or even easier, a triangle and fill it with solid color. Go to the Shapes menu again, locate the Isosceles Triangle (or a diamond shape) and draw on the slide. Use the rotation handles on top of the triangle or the Rotate menu to turn it right by 90 degrees (see the screenshot below).
Lastly, change the color of the shape to orange or any other color of your choice. Ro do that, simply select the shape, right click, Format Shape > Fill- Solid Fill > Color - Orange > Line - No line.
Add your presentation title, company name and logo and your professional cover slide template is ready!
Download the Complete Business Transformation PowerPoint Deck
Examples of Stunning PowerPoint Cover Slides Using Image & Shapes
#1- Pricing Strategy Cover Slide
Download Pricing Strategy PowerPoint Deck
#2- Revenue Model PPT Cover Slide
Download Revenue Model PowerPoint Presentation
#3- Project Conclusion Presentation Cover Slide
Download Project Conclusion PPT Deck
#4- McKinsey 7S Strategic Management
Download the Complete McKinsey 7S Deck
#5- Business Plan PPT Cover Slide
Download the Complete Business Plan PowerPoint Presentation
#6- Business Strategic Planning PPT Cover Slide
Download Business Strategic Planning Deck
#7- Business Operational Strategy PPT Cover Slide
Download Business Operational Excellence Strategy PPT
#8- Business Performance Analysis and Planning
Download Business Performance Analysis PPT Slide
How did you find the tutorial? Faced any problems at any step? Get in touch with us by leaving a comment in the comments section below and we will get back to you. Also don't forget to check out our previous tutorial on cover slide template by clicking the link below:




 Customer Reviews


