“You don’t know how to use Slide Master!” a shocked HR professional said when I revealed that I had never used the same. “It saves a lot of time,” she continued. “It kills creativity,” I argued (I remembered the boring to death HR presentations).
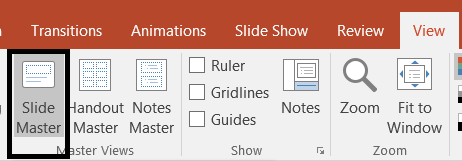
What could be the harm in knowing how to use Slide Master? So, I googled “how to use slidemaster in PowerPoint”, opened the Microsoft Office article and followed the instructions. The first step was easy- Click the View tab on the PowerPoint Ribbon and click Slide Master.
A row of black and white slides opened on the screen, which was frankly quite scary, and made me instantly close the Master View. Despite clear instructions in PowerPoint, I had trouble understanding what slide 1 was and what to do with the slides underneath it. Specifically, which was the Title Slide, Text Slide, and Section Header slide?
Only until recently, a professional designer explained me this seemingly complicated process in a minute and since then, I am full of admiration for this PowerPoint feature. Let me pass on the PowerPoint wisdom in the simplest of words:
What is Slide Master After All?
Now, many of the old PowerPoint users know this already. But many do not. So let’s be on the same page and understand what it is. Only then can we understand why do we really need it.
A Slide Master is basically a design template that stores all information about your slide layouts, fonts, themes, colors, etc. The Master Slide controls the look of your entire presentation. If you add a logo on the master slide, it automatically applies it to all slides in your presentation. Make universal changes in a presentation with a single slide.
Why Do We Need Slide Master?
First, to SAVE TIME. Say you have 65 slides in your presentation. Rather than manually add a logo or section header in each of the 65 slides, add that on slide master and voila, work is done! Time and efforts saved, a lot!
Second, ENSURE DESIGN CONSISTENCY. To look professional, you need to give a consistent look to your presentation. Slide Master lets you do that in jiffy. If you want a consistent headline font and body font, specify that in Slide Master and all formatting is done in a second.
Third, CREATE CUSTOM PPT TEMPLATES. No need to depend on PowerPoint default themes. Audience have seen them too many times and frankly speaking, they are bored of it. So, let’s create something which is modern and matches the personality of your brand. We can easily accomplish the goal of creating our own PowerPoint Templates with Slide Master.
Getting Started with Slide Master:
You know how to open Slide Master now (View tab> Slide Master). But what next? Let’s understand slide 1 (see screenshot below) and the first three slides under it:
Slide 1 (The largest slide on top) is the Slide Master / Master Slide / Master Layout. Whatever you put here will trickle down to all the slides below it. The Master Slide has 9 slide layouts below it. For now, let’s remember the first three:
- First slide under Master Slide is Title Slide (or Cover Slide; basically the first slide that we see in our presentation)
- Second slide under Master Slide is Text Slide
- Third slide under Master Slide is Section Header Slide
You can add a Master Slide 2 also and so on. Say you are delivering a Sales Presentation and you want to give the second half of the presentation (say Future Projections) a different look. You can do that by adding another Slide Master.
Now that we know the basics, let’s use the Slide Master to create our own branded template in PowerPoint.
Easy Steps to Create Your Custom PowerPoint Template
“How to create a PowerPoint Template 2010, how to create a PowerPoint Template 2013, or how to create a PowerPoint Template 2016.” If any of these has been your search query, open the Slide Master and follow these steps:
Step 1- Insert Your Logo on Slide Master
Now, step by step we will be adding those design elements on the Slide Master that we need on all slides. Basically, to create our customized template!
A company logo is one that we usually need on all slides in a PPT. Add it on the Slide Master (the first and largest slide in the pane) and it will automatically get added to all slides. Choose the logo position on the slide- bottom left, bottom right, top left, or top right. Bottom right is the most preferred location across many designs but there’s no hard and fast rule. For purpose of illustration, we have added our own company logo- SlideTeam on the bottom left on the Slide Master and it automatically trickled down to all slides below it.
Step 2- Create your Branded Header/Footer on Slide Master
Now, add a design element that you want to see on all slides. This design element can reflect your branding colors and give a consistent look and feel to your entire presentation. This design element can be a shape, image or icon. For illustration purposes, we have added three boxes using our brand colors (blue and grey) in the header of the slide. Go to the Insert tab> Shapes menu to access the rectangle.
Automatically, the header is replicated across all slides. One of the biggest advantages of Slide Master is that you can share this template with your team members and all business presentations delivered inside and outside will carry the same brand identity. Your team members won’t be able to fiddle with the template and spoil the look of the slide as it is locked (unless they go to Slide Master to spoil it).
We inserted a blue rectangle on top and three grey rectangles below it to create a header. You can use your company colors to create a similar header or footer.
Alternative: Create a template using image
Say you wanted to use the below image for your cover slide and want to create a template out of it. You want a strip of this image to be in each slide. You can easily do that with Slide Master. First of all, open the Slide Master and add the image on the Slide Master.
Next, Crop the Image. Select the image you want to crop, go to the Format tab Picture Tools, locate the Crop button and use it to crop the selected portion. Place it where you want it to appear on all ppt slides.
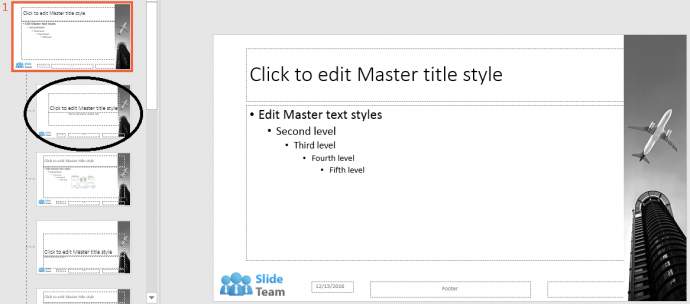
Why did I encircle the first slide under the Slide Master? Because that will be our Cover Slide when we close the master view. And we do not want the image strip to appear there. We would obviously be using the same image in its full proportion on the cover slide. Try removing that manually from title slide and you will find it is locked. Don’t worry. Slide Master has that flexibility.
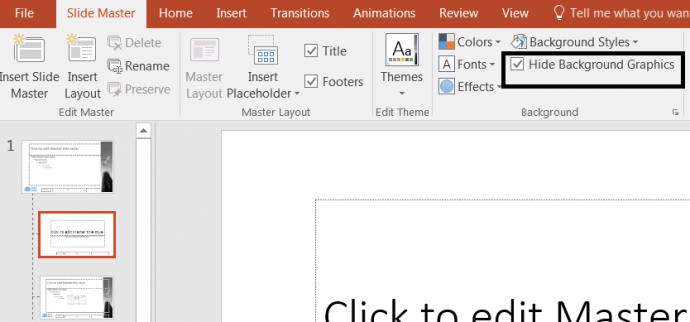
- Select the slide where you do not want the image strip to appear (say Title Slide and Section Header slide).
- Select the Hide Background Graphics option
Now, this will remove all the background graphics on that slide. As you can see in the screenshot above, even our blue logo has been removed. We will have to manually add the same (if we want it on cover slide) after we close the Master View. This cool “Hide Background Graphics” feature is not just available in Slide Master. You can access it in normal view too. Just select the slide where you want the graphic to disappear, right click, click Format Background. The Format Background window will open to the right. Select the Hide Background Graphics option and the graphics will get removed from that particular slide!
Step 3- Add Slide Number Box on Master Slide
If your presentation is becoming a bit long, then adding page number is a useful practice. You can’t add slide numbers from the Slide Master tab. But you can add a design element like slide number box (square, circle, or any other shape) as a branding element.
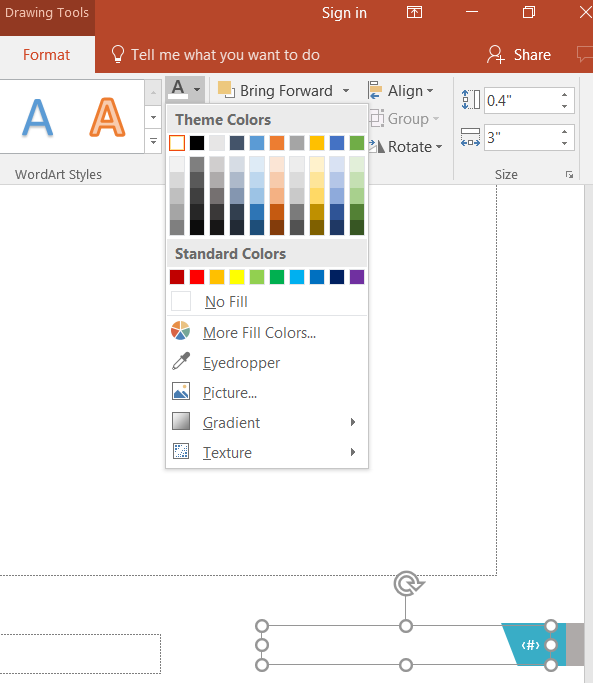
The hashtag is the Slide Number box and the blue-grey shape we have created is the customized slide number box we want to show behind each slide number. Place the grey hashtag on top of the customized shape (you can insert a circle, a triangle or any shape that suits your branding needs). If it is going behind the shape, go to the Format tab and click Bring Forward > Bring to Front. Change the color of the hashtag to a contrasting color using Text Fill so that slide number stands out (see the screenshot below).
How to add Slide Numbers?
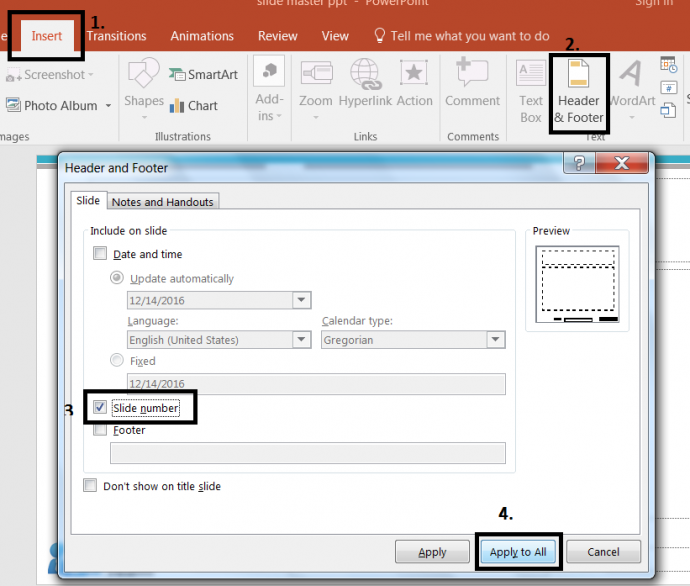
Follow these steps to get slide numbers added automatically to slide:
- Click the Insert tab
- Click the Header & Footer button
- In the Header and Footer dialog box, select the Slide Number checkbox
- Click the Apply to All button
When you close the Slide Master view and start working on your presentation, each slide number will automatically appear as you keep adding new slides.
Step 4- Create Your Theme Font
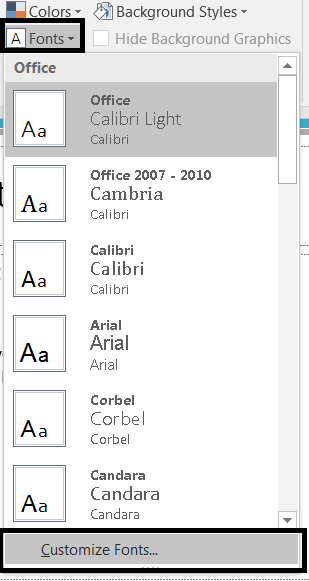
No need to keep clicking the Font list every time to customize the fonts for your slide. You can create your theme font set in the Slide Master and accordingly, text on all slides will get formatted. This is a great time saver and will ensure that all team members using this template will use the same theme font set. Here’s how you do that:
- Open the Fonts menu in Slide Master
- Click the Customize Fonts… option at the bottom
- A Create New Theme Fonts dialog box will open on your screen
- Specify the Heading font and Body font you want for the entire presentation
- You can give it a name, if you wish to
- Click Save
That’s it. Text on all ppt slides will change at once!
Step 5: Customize Text, Chart Colors in Slide Master
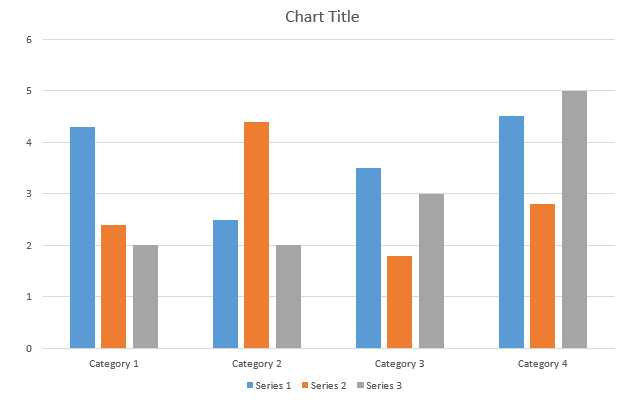
Use your brand colors throughout the slides whether it is the color of text, shapes, SmartArt and Charts. Why manually change the colors on each slide one by one when Slide Master is there! Whenever you insert a shape, SmartArt or Chart, PowerPoint inserts the same based on its default colors. You get a Chart, for instance, in the following colors:
Now, these may not be your brand colors. You just want shades of blue, for instance. And you do not want to keep making changes on each and every slide. That will be quite a chore. Slide Master allows you to create your own presentation color scheme (so that whenever you insert an object, it will automatically appear in your defined color scheme). You can create that by following these steps:
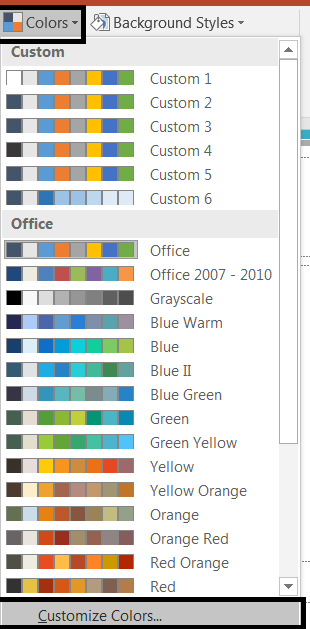
- Open the Colors menu in the Slide Master
- Click the Customize Colors… option at the bottom
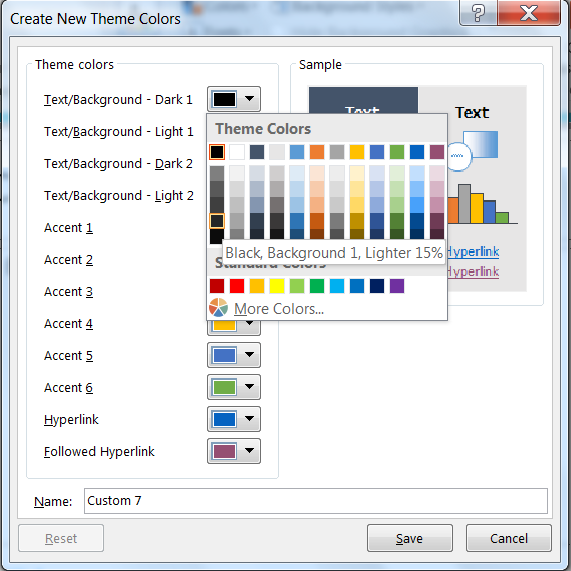
A Create New Theme Colors dialog box will open on your screen. As you can see in the screenshot below, since my slide background is white, it shows Text/Background- Light 1 as white. That is your background color. Since I want to keep that as it is, I won’t change that. But I want my text color in the entire presentation to be dark grey (as it looks more professional). So, I will open the color menu under Text/Background- Dark 1 as Dark Grey (see the screenshot below). Once I click Save, the entire text color will be formatted accordingly. Coool!
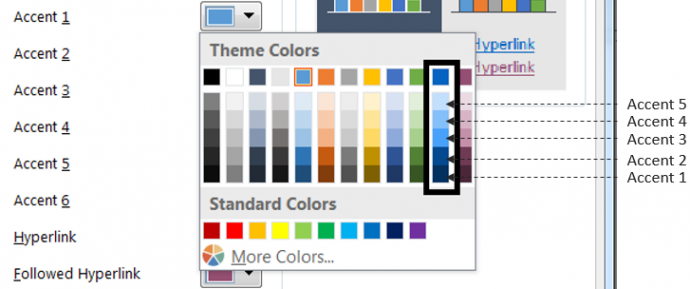
But since I also want to change the color of objects on my slide, I will change the default colors of Accent 1 to 6. I will choose a shade of blue in Accent 1 and keep choosing the lighter version of that color in each accent below.
If my brand color is not in the default theme colors, I can click More Colors and locate my color from the Color Wheel. You will notice the changes in the Preview window in the corner simultaneously as you make changes. You can change the color of Hyperlinks too. Once you have set your color preferences, click the Save button and your custom theme colors are ready!
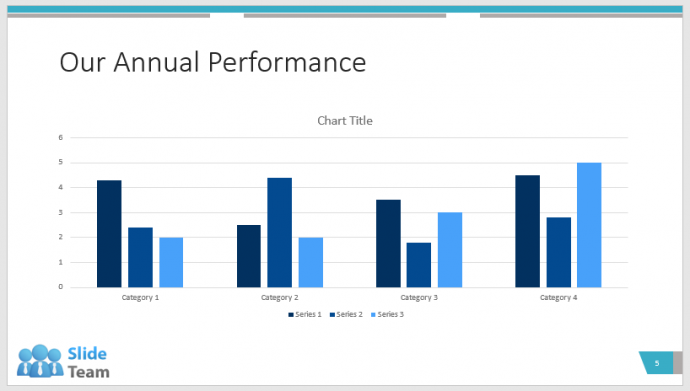
Now, close the Master View, go to the Insert tab, insert a Chart, and see the difference!
Text is dark grey and chart colors are customized. This will populate across all slides saving so much of my time!
P.S. Save Your Template as a .POTX File
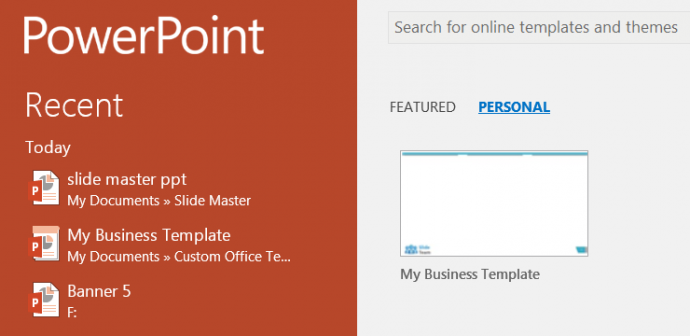
Save the template that you have created in Slide Master to be used for future presentations. Go to the File tab and click Save As. From the drop-down menu, select the PowerPoint Template (*.potx) option. Be default, it will get saved in Custom Office Templates in your Documents folder. So, whenever you open a new presentation in future, you will find this template under the Personal category (see the screenshot below) and access it for your PowerPoint presentation.
To sum up, this is typically what I use Slide Master for:
- Add Company Logo on all slides
- Create branded header/footer (my template style)
- Add Slide Number box
- Create Theme Font set
- Create Theme Colors
But you can do much more with Slide Master. Check out all the functionalities on the Slide Master tab in the screenshot below. You can apply a specific theme to the entire presentation, insert placeholders, insert layouts, add effects that you want to appear on all slides, choose background styles, etc. I do not use these features much as I do not wish to use the default PowerPoint themes, layouts and background styles. I like using my design knowledge to create all these. But you can give them a try and see if you like anything.
When all formatting is done in Slide Master, click Close Master View (top right corner) and return to your normal mode. You have saved minutes, probably hours, all thanks to Slide Master!
How do you use Slide Master? Share with us your feedback in the comments below.



 Customer Reviews







![[Morph PowerPoint Tutorial] Beginner’s Guide to Using the Morph Transition in PowerPoint 2016](https://www.slideteam.net/wp/wp-content/uploads/2016/12/Morph-Tutorial-PowerPoint-How-to-Use-the-Morph-Transition-Feature-in-PowerPoint-2016-335x146.png)
